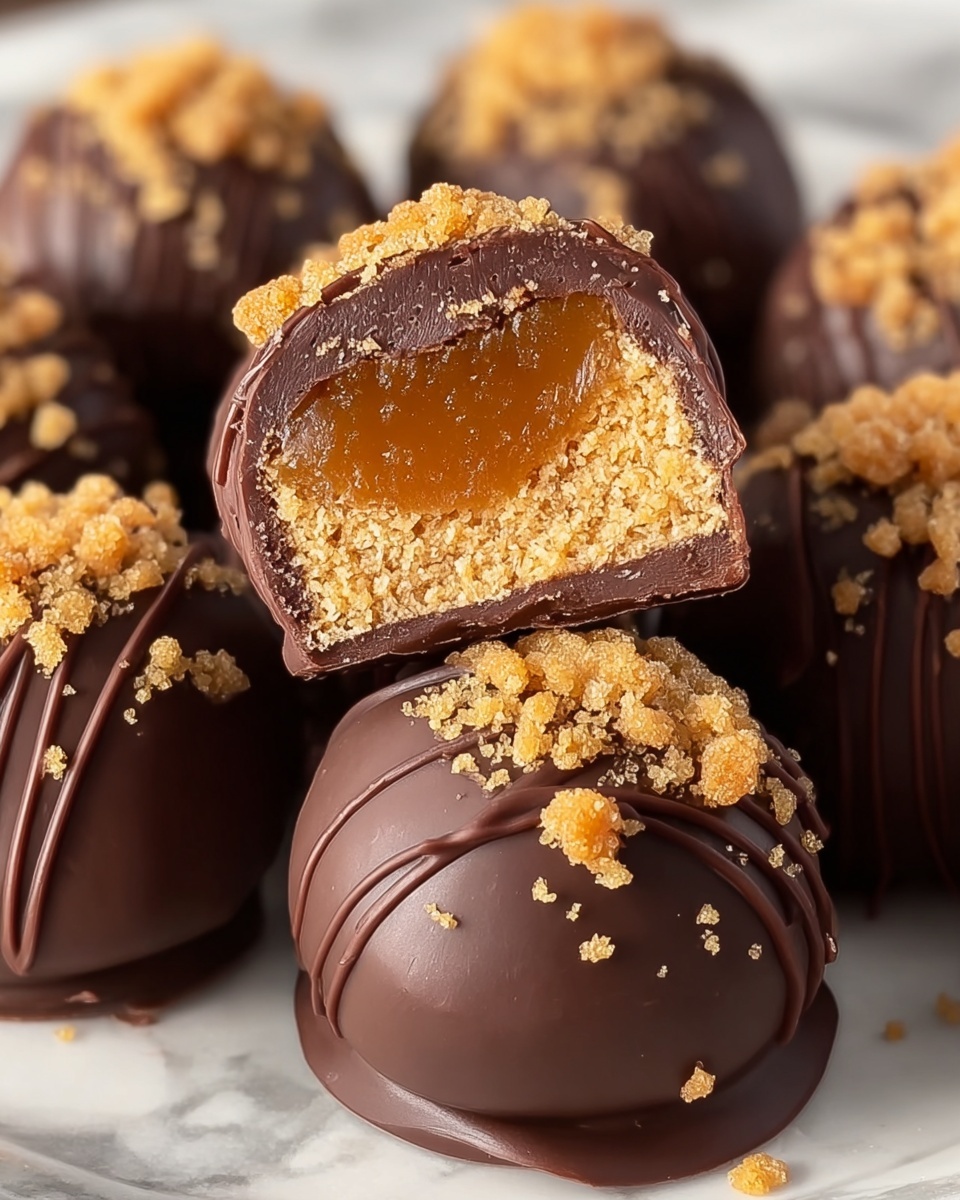
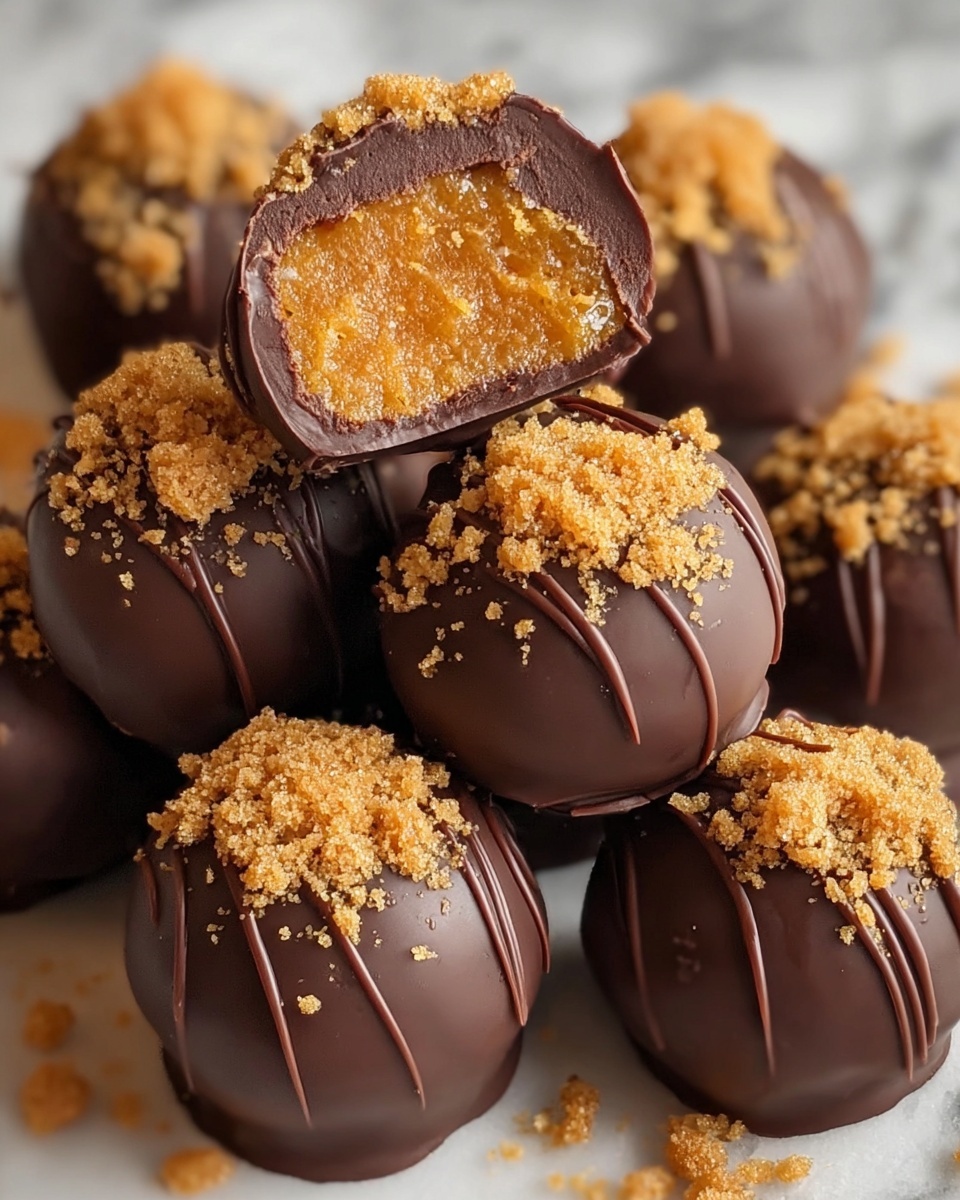
There is something incredibly satisfying about those rich, peanut buttery bites of joy that come wrapped in a cloak of chocolate and candy crunch. That’s exactly what the Butterfinger Balls: No-Bake Peanut Butter Candy Treats Recipe delivers. Imagine the perfect harmony of crushed Nutter Butter cookies, creamy peanut butter, and chunks of Butterfinger candy all rolled into delightfully bite-sized balls, then dipped in silky chocolate. These no-bake treats are effortless but packed with layers of flavor and texture sure to thrill anyone with a sweet tooth. Whether you’re looking to whip up a last-minute dessert for guests or indulge in a decadent homemade candy snack, this recipe is your new go-to favorite.
Ingredients You’ll Need
This recipe comes together with just a handful of simple, pantry-friendly ingredients, each playing a crucial role in achieving that perfect taste and texture combo. From the crunchy cookie base to the luscious peanut butter and the crunchy candy pieces, every element adds its magic to the Butterfinger Balls.
- Nutter Butter cookies: Crushed into fine crumbs, they create a sturdy yet tender base that holds everything together beautifully.
- Creamy peanut butter: Adds creamy richness and classic peanut flavor that’s irresistible.
- Powdered sugar: Sweetens perfectly and helps with the right dough consistency to roll easily.
- Vanilla extract: Enhances the overall flavor with a subtle, warm aromatic note.
- Crushed Butterfinger candy bars: Adds iconic crunchy, crispy candy texture and a buttery, chocolatey peanut punch.
- Semi-sweet chocolate chips: For dipping, creating a smooth, shiny chocolate shell that perfectly complements the peanut butter center.
- Coconut oil or shortening: Helps melt the chocolate evenly and results in a glossy finish on the coating.
How to Make Butterfinger Balls: No-Bake Peanut Butter Candy Treats Recipe
Step 1: Prepare the dough
Start by crushing the Nutter Butter cookies into fine crumbs; the texture is key here since it forms the perfect base for holding the balls together. In a large bowl, mix together these cookie crumbs, creamy peanut butter, powdered sugar, vanilla extract, and the irresistible crushed Butterfinger candy pieces. Stir everything until you get a thick, cohesive dough that’s easy to scoop and shape.
Step 2: Shape into balls
Use a tablespoon to scoop portions of the dough, then roll each into smooth, compact balls. The sizing is ideal for bite-sized indulgence — just enough to enjoy a burst of all those layers without being overwhelming. Place each ball on a parchment-lined baking sheet to prepare for chilling.
Step 3: Chill until firm
Pop the tray into the freezer for about 20 to 30 minutes. This step is essential because it firms up the dough, making the balls easier to dip in chocolate without falling apart. Plus, it gives your treats that refreshing, cool bite once ready to eat.
Step 4: Melt the chocolate coating
While the balls are chilling, melt the semi-sweet chocolate chips with a tablespoon of coconut oil or shortening in a microwave-safe bowl. Heat in 30-second bursts, stirring in between until completely smooth and shiny. This luscious chocolate coating will give your Butterfinger Balls their final, delectable finish.
Step 5: Dip and decorate
Remove the balls from the freezer, and using a fork or dipping tool, fully coat each ball in the melted chocolate. Place them back on the parchment paper. For an extra touch, sprinkle some crushed Butterfinger candy on top before the chocolate sets — it adds a pretty, crunchy finish. Chill again in the refrigerator for about 15 minutes until the chocolate has hardened beautifully.
How to Serve Butterfinger Balls: No-Bake Peanut Butter Candy Treats Recipe

Garnishes
To make your Butterfinger Balls even more eye-catching, consider topping them with finely chopped peanuts, a dusting of cocoa powder, or even a drizzle of white chocolate. These small touches add both texture and visual appeal, making your candy treats party-ready and utterly irresistible.
Side Dishes
These candy balls shine brilliantly on their own as a rich dessert bite but also pair well with simple accompaniments like fresh fruit or a scoop of vanilla ice cream. The creamy ice cream balances the candy’s sweetness and adds an extra layer of indulgence that guests will love.
Creative Ways to Present
Presentation can turn a delightful recipe into an unforgettable experience. Serve your Butterfinger Balls on a decorative platter lined with colorful tissue paper, or arrange them in cupcake liners for individual servings. You might also consider gift wrapping a batch in cellophane and ribbon to share your homemade joy with friends and family.
Make Ahead and Storage
Storing Leftovers
After you’ve enjoyed your Butterfinger Balls, store any leftovers in an airtight container in the refrigerator. They keep beautifully for about one week, maintaining their delightful texture and flavor without getting soggy or losing their crisp chocolate shell.
Freezing
If you want to keep these treats longer, freezing is your best friend. Place the Butterfinger Balls in a single layer on a baking sheet to freeze initially, then transfer them to a freezer-safe container or bag. They’ll last up to three months in the freezer, perfect for anytime craving or special occasions down the road.
Reheating
Because these are no-bake delights, “reheating” means gently bringing them back to room temperature rather than applying heat. Let frozen Butterfinger Balls sit at room temp for about 15-20 minutes before serving to soften slightly and enhance their flavors without melting the chocolate shell.
FAQs
Can I substitute the Nutter Butter cookies for something else?
Absolutely! Graham crackers or Oreos work wonderfully as alternatives, creating slightly different textures and flavors but still delivering that crunchy base your Butterfinger Balls need.
Is there a way to make these gluten-free?
Yes, swap regular cookies for gluten-free cookies that suit your dietary need. Just make sure the rest of your ingredients, like the Butterfinger candy, are also gluten-free to avoid any issues.
Can I use crunchy peanut butter instead of creamy?
Sure can! Crunchy peanut butter adds even more texture and nutty flavor, making the experience of biting into these balls delightfully crunchy throughout.
How long do Butterfinger Balls last in the fridge?
Stored properly in an airtight container, they typically stay fresh and delicious for up to a week. Beyond that, the texture might change, but they often remain tasty for a bit longer.
Do I have to use coconut oil for melting chocolate?
While coconut oil or shortening helps give the chocolate a smooth and glossy finish, you can melt chocolate chips alone. Just be gentle to avoid seizing and stir well for an even consistency.
Final Thoughts
You really can’t go wrong with the Butterfinger Balls: No-Bake Peanut Butter Candy Treats Recipe when you want an easy, irresistibly delicious dessert that’s quick to make and guaranteed to please. With its perfect balance of creamy, crunchy, and chocolaty, these treats are sure to become a beloved classic for your family and friends. So grab those ingredients, roll up your sleeves, and get ready to enjoy one of the coziest, yummiest candy experiences out there!
Print
Butterfinger Balls: No-Bake Peanut Butter Candy Treats Recipe
- Prep Time: 20 minutes
- Cook Time: 0 minutes
- Total Time: 50 minutes
- Yield: 24 balls
- Category: Dessert
- Method: No-Cook
- Cuisine: American
- Diet: Vegetarian
Description
Butterfinger Balls are a delightful no-bake dessert featuring a creamy blend of crushed Nutter Butter cookies, peanut butter, powdered sugar, and Butterfinger candy, all coated in rich melted chocolate. Perfect for holiday treats or any sweet craving, these easy-to-make peanut butter truffles combine crunchy candy and smooth chocolate for a satisfying indulgence.
Ingredients
Base Mixture
- 1 (16-ounce) package of Nutter Butter cookies, crushed into fine crumbs
- 1 cup creamy peanut butter
- 1 cup powdered sugar
- 1 teaspoon vanilla extract
- 1 cup crushed Butterfinger candy bars (about 4 fun-size bars)
Coating
- 2 cups semi-sweet chocolate chips
- 1 tablespoon coconut oil or shortening
Instructions
- Prepare the Dough: In a large mixing bowl, combine the crushed Nutter Butter cookies, creamy peanut butter, powdered sugar, vanilla extract, and crushed Butterfinger candy bars. Mix thoroughly until the ingredients form a thick, cohesive dough.
- Shape the Balls: Scoop out tablespoon-sized portions of the dough and roll each portion into a smooth ball using your hands. Place the balls evenly spaced on a baking sheet lined with parchment paper.
- Chill the Balls: Freeze the dough balls on the baking sheet for 20 to 30 minutes, or until they become firm and hold their shape.
- Melt the Chocolate: In a microwave-safe bowl, combine the semi-sweet chocolate chips with the coconut oil or shortening. Microwave in 30-second intervals, stirring between each interval, until the chocolate is completely melted and smooth.
- Dip the Balls: Remove the chilled dough balls from the freezer. Using a fork or dipping tool, dip each ball into the melted chocolate to coat it completely. Allow excess chocolate to drip off, then place the coated balls back onto the parchment-lined baking sheet.
- Optional Topping: While the chocolate coating is still wet, sprinkle additional crushed Butterfinger candy on top of each ball for extra texture and flavor.
- Set the Chocolate: Place the coated balls in the refrigerator and chill for about 15 minutes, or until the chocolate coating is fully set.
- Store: Keep the Butterfinger Balls in an airtight container in the refrigerator until ready to serve to maintain freshness.
Notes
- You can substitute graham crackers or Oreos for the Nutter Butter cookies if desired.
- Almond butter can be used instead of peanut butter for a different flavor profile.
- Ensure the chocolate is fully melted but not overheated to avoid seizing.
- Store the balls in the refrigerator to prevent the chocolate from melting, especially in warm weather.

