
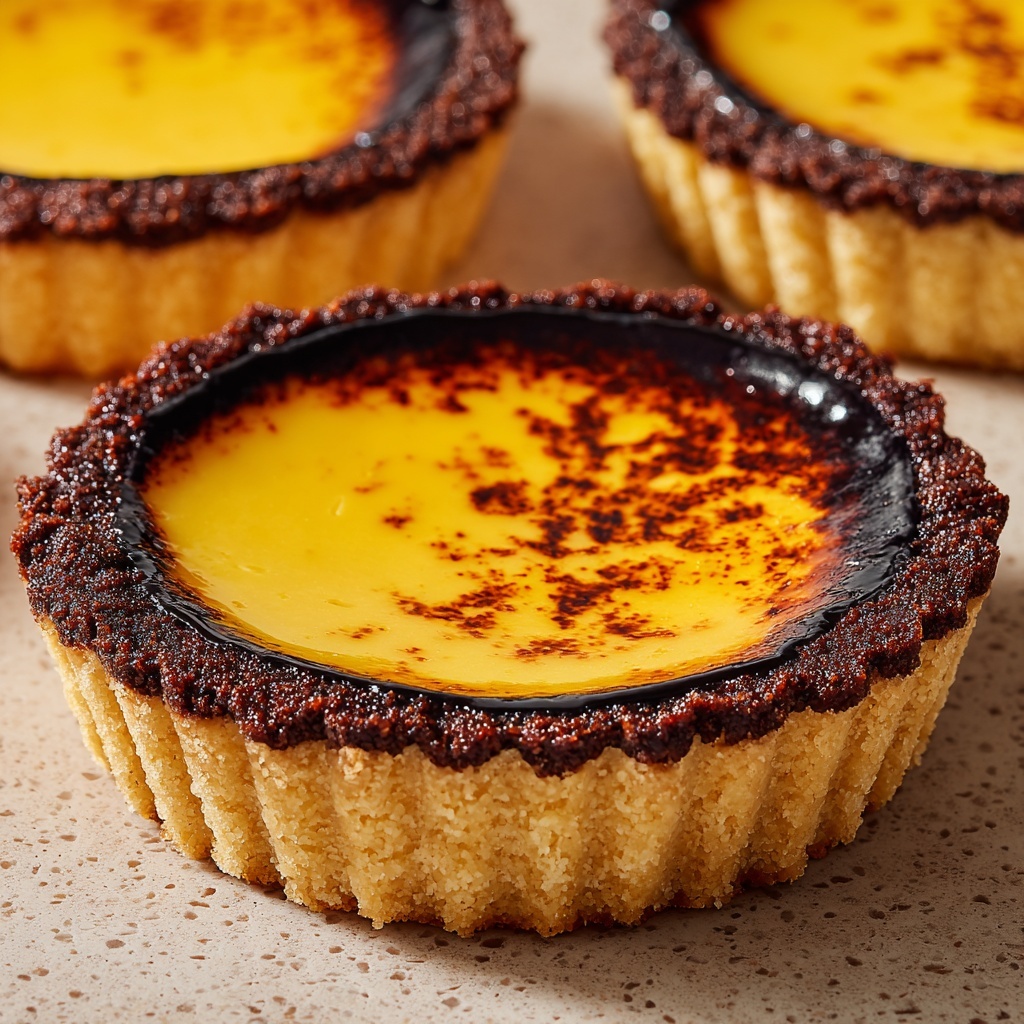
If you’ve ever wondered how to capture the heart and soul of Canadian baking in one delicious treat, look no further than this Best Classic Canadian Butter Tarts Recipe. These tarts are tiny packages of pure joy, combining a flaky pastry crust with a luscious, gooey filling that dances between sweet, buttery, and just a touch chewy from the optional raisins or pecans. They’re simply irresistible, offering the perfect balance of rich caramel notes and soft texture that keeps people coming back for more. Whether you’re new to Canadian desserts or a longtime fan, this recipe will quickly become a cherished staple in your kitchen.
Ingredients You’ll Need
This recipe uses simple, every day ingredients that are easy to find but essential in building the wonderful layers of flavor and texture that define the Best Classic Canadian Butter Tarts Recipe. Each component plays a vital role, from the buttery crust providing a flaky base to the sweet, syrupy filling that melts beautifully in your mouth.
- 12 unbaked tart shells: Whether store-bought or homemade, these form the perfect crispy, flaky container for the luscious filling.
- 1/2 cup packed brown sugar: Adds deep, caramel-like sweetness and moisture to the filling.
- 1/2 cup corn syrup: Creates that signature sticky, glossy texture essential to the classic tart experience.
- 1/4 cup unsalted butter, melted: Enhances richness and brings everything together with a creamy mouthfeel.
- 1 large egg: Binds the filling ingredients while contributing a slight structure for perfect set tarts.
- 1 teaspoon vanilla extract: Adds a warm, fragrant flavor that lifts every bite.
- 1 teaspoon white vinegar: Balances sweetness and subtly brightens the overall flavor.
- 1/4 teaspoon salt: Amplifies all the sweet and buttery notes without making the tart taste salty.
- 1/2 cup raisins or chopped pecans (optional): Offers delightful texture contrast and bursts of sweetness or crunch.
How to Make Best Classic Canadian Butter Tarts Recipe
Step 1: Preheat and Prepare
Start by preheating your oven to 375°F (190°C). If you’re using frozen tart shells, let them thaw slightly on a baking sheet while you prepare the filling. This ensures the shells won’t get soggy and will bake to a perfect golden finish.
Step 2: Mix the Filling
In a medium bowl, whisk together the brown sugar, corn syrup, melted butter, egg, vanilla, white vinegar, and salt until everything is smooth and thoroughly combined. This mixture is the heart of the butter tarts and is what gives them that irresistible gooey center.
Step 3: Add Nuts or Raisins (If Using)
If you love a little texture contrast, divide the raisins or chopped pecans evenly among the tart shells. They add delightful bursts of flavor that complement the sweet filling perfectly. However, if you prefer a pure caramel experience, feel free to skip this step.
Step 4: Fill the Tart Shells
Pour the filling mixture into each tart shell, filling about two-thirds full. This helps prevent the liquid from overflowing during baking while leaving enough space for the filling to bubble up beautifully.
Step 5: Bake to Perfection
Bake for 18 to 22 minutes until the filling bubbles and the crust turns a lovely golden brown. For a runnier, almost custardy center, stick to the shorter baking time; for a firmer, chewy filling, let them bake a bit longer. Keep an eye on them—every oven has its quirks!
Step 6: Cool and Enjoy
Let the tarts cool in the pan for about 10 minutes before carefully transferring them to a wire rack. This cooling time helps the filling set just enough to make them easy to handle without losing that signature gooey texture inside.
How to Serve Best Classic Canadian Butter Tarts Recipe

Garnishes
While these tarts are perfect on their own, a light dusting of powdered sugar or a drizzle of cream can elevate their look and flavor. For special occasions, consider topping with a small dollop of whipped cream or a few fresh berries to add a burst of freshness and color.
Side Dishes
Butter tarts pair wonderfully with simple sides like a scoop of vanilla ice cream or a cup of freshly brewed coffee or tea. They also make a charming end to brunch or an afternoon tea party, perfectly balancing sweetness without overwhelming your palate.
Creative Ways to Present
If you want to wow guests, try serving butter tarts on a tiered dessert stand alongside assorted Canadian treats like Nanaimo bars or maple cookies. Another fun idea is to warm them slightly and serve with a drizzle of warm caramel sauce for an indulgent dessert experience.
Make Ahead and Storage
Storing Leftovers
Best Classic Canadian Butter Tarts Recipe tarts are best enjoyed at room temperature but can be kept fresh for up to 3 days in an airtight container. Simply store them on a plate covered loosely with plastic wrap or a lid.
Freezing
These tarts freeze beautifully. Wrap each tart individually in plastic wrap and place them in a freezer-safe container or zip-top bag. They can be frozen for up to 2 months without sacrificing quality. Just thaw in the fridge overnight before serving.
Reheating
To enjoy a freshly baked feel, reheat your butter tarts in a 325°F (160°C) oven for about 5 to 7 minutes. This restores their soft, gooey texture and crisp crust, making them taste almost as if freshly made.
FAQs
Can I make the tart shells from scratch?
Absolutely! Homemade tart shells made from a flaky butter pie crust add an extra layer of richness and freshness. Just roll out your dough and cut into 4-inch rounds to fit your tart tins before baking.
What if I don’t like raisins or pecans?
No worries! The Best Classic Canadian Butter Tarts Recipe tastes incredible without any add-ins, showcasing the sweet, buttery filling in all its glory. You can leave them plain or experiment with other mix-ins like currants or chopped walnuts.
Is it important to use white vinegar?
Yes, a small amount of white vinegar brightens the filling subtly and balances out the sweetness. It’s a traditional ingredient that helps keep the filling from becoming too cloying.
How do I get a runnier filling?
For that perfect gooey center, bake the tarts on the lower end of the time range (around 18 minutes). Keep an eye on them so they’re bubbling but still soft inside.
Are butter tarts vegetarian?
Yes! This recipe contains no meat or gelatin, making it suitable for a vegetarian diet. Just be sure to use butter from vegetarian sources if you follow a stricter diet.
Final Thoughts
There’s nothing quite like the warm comfort of the Best Classic Canadian Butter Tarts Recipe, and once you try it, I promise it will hold a special place in your baking repertoire. These tarts capture a piece of Canadian heritage with every bite and bring smiles to every table. Don’t hesitate to dive in and share this delightful little treat with friends and family—you’ll be spreading pure joy, one buttery tart at a time!
Print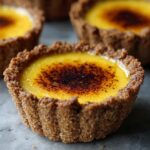
Best Classic Canadian Butter Tarts Recipe
- Prep Time: 15 minutes
- Cook Time: 20 minutes
- Total Time: 35 minutes
- Yield: 12 butter tarts
- Category: Dessert
- Method: Baking
- Cuisine: Canadian
- Diet: Vegetarian
Description
This Best Classic Canadian Butter Tarts recipe features a rich, sugary filling encased in flaky tart shells, offering a traditional sweet treat beloved across Canada. Made with brown sugar, corn syrup, butter, and optional raisins or pecans, these buttery tarts are perfect for holiday baking or any occasion that calls for a delightful dessert.
Ingredients
Ingredients
- 12 unbaked tart shells (store-bought or homemade)
- 1/2 cup packed brown sugar
- 1/2 cup corn syrup
- 1/4 cup unsalted butter, melted
- 1 large egg
- 1 teaspoon vanilla extract
- 1 teaspoon white vinegar
- 1/4 teaspoon salt
- 1/2 cup raisins or chopped pecans (optional)
Instructions
- Preheat Oven: Preheat your oven to 375°F (190°C). If using frozen tart shells, place them on a baking sheet and allow to thaw slightly while you prepare the filling.
- Prepare Filling: In a medium bowl, whisk together brown sugar, corn syrup, melted butter, egg, vanilla extract, white vinegar, and salt until the mixture is smooth and well combined.
- Add Nuts or Raisins: If using raisins or pecans, evenly divide them among the tart shells, placing them at the bottom.
- Fill Tart Shells: Pour the filling mixture into each tart shell, filling about two-thirds full to avoid overflow during baking.
- Bake the Tarts: Bake in the preheated oven for 18–22 minutes until the filling is bubbling and the pastry is lightly golden. For a softer center, bake closer to 18 minutes; for a firmer filling, bake longer.
- Cool Tarts: Allow the tarts to cool in the pan for 10 minutes, then carefully transfer them to a wire rack to cool completely before serving.
Notes
- You can substitute golden raisins or currants for a different flavor or skip the mix-ins for a classic plain butter tart.
- For homemade tart shells, use a flaky butter pie crust rolled and cut into 4-inch rounds.
- Butter tarts are best eaten at room temperature for optimal texture and flavor.
- Store leftovers in an airtight container at room temperature for up to 3 days, or freeze for longer storage.
