
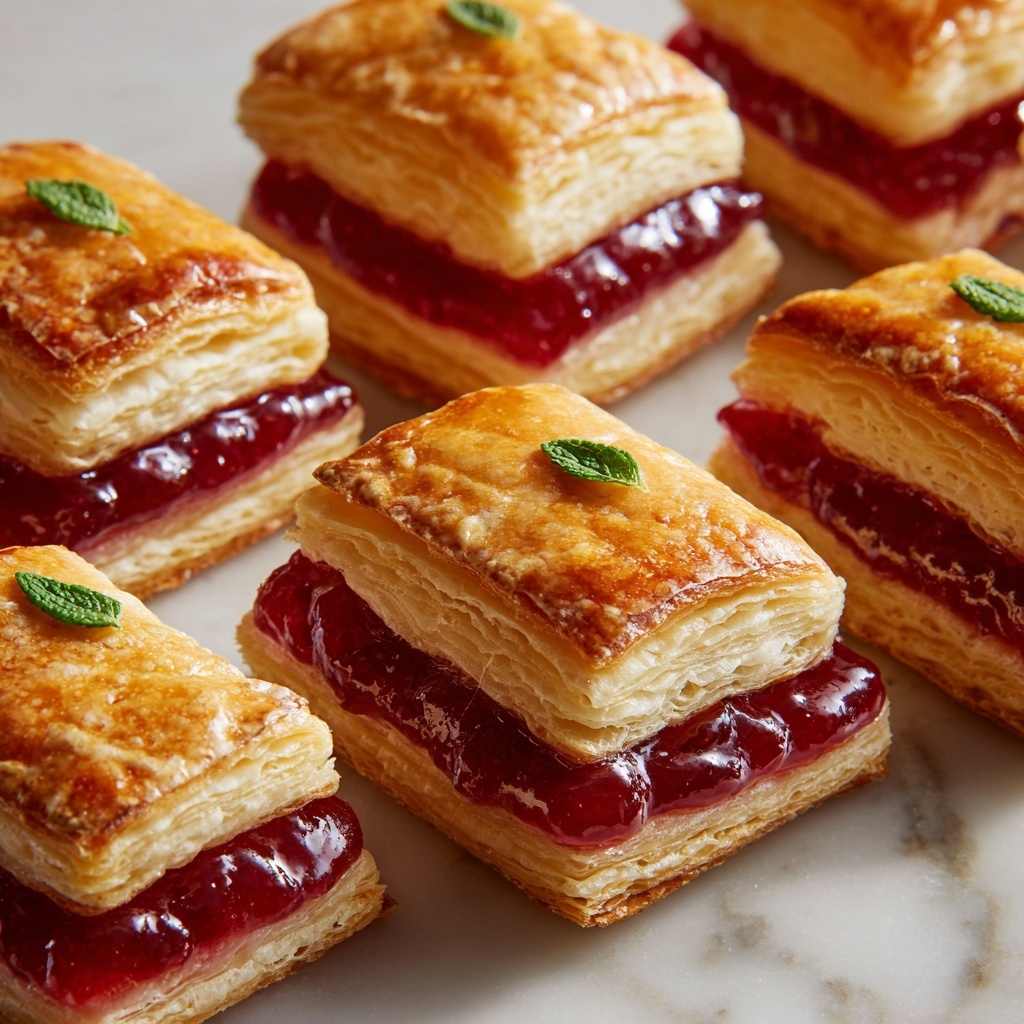
If you’re looking to impress without hours in the kitchen, this Cherry Cheese Danish Recipe is your new best friend. It’s a delightful blend of creamy cheese and vibrant cherry filling wrapped in flaky, buttery puff pastry. Every bite offers a perfect balance of tart and sweet with a lightly crisp exterior, making it an irresistible treat for breakfast, brunch, or even a casual dessert. Trust me, once you try this Cherry Cheese Danish Recipe, you’ll be reaching for it every chance you get.

Ingredients You’ll Need
This recipe keeps it wonderfully simple, relying on a handful of key ingredients that each bring something special to the table—from the creamy richness of the cheeses to the bright, fruity pop of cherry. Each component plays its role in delivering that perfect texture and flavor harmony we all crave.
- Cream cheese (4 oz, softened): The foundation for the smooth, tangy cheese filling that melts delightfully in your mouth.
- Sugar (¼ cup): Sweetens the cheese mixture just enough to balance tartness nicely.
- Egg yolk (1): Adds richness and helps bind the cheese filling for the right consistency.
- Ricotta cheese (1 tablespoon): Offers a light creaminess and a subtle texture contrast against the cream cheese.
- Almond extract or vanilla extract (½ teaspoon): Infuses the filling with a warm, fragrant note that elevates every bite.
- Pinch of salt: Essential for enhancing and balancing the sweetness.
- Lemon zest (½ tablespoon): Adds a fresh, citrusy brightness that keeps the flavors lively.
- Puff pastry sheets (2 sheets, thawed): Your crisp, flaky vessel for the decadent filling, creating layers of deliciousness.
- Flour (for dusting): Prevents sticking while you roll out the pastry.
- Cherry pie filling (1 can): The jewel on top, providing juicy bursts of sweet-tart cherries in every bite.
- Egg wash (1 large egg beaten with 1 tablespoon water): Gives your danishes that picture-perfect golden glaze and shine.
How to Make Cherry Cheese Danish Recipe
Step 1: Prepare the Cheese Filling
Start by softening the cream cheese until it’s perfectly smooth, then blend it with sugar to create a luscious base. Next, add the egg yolk and ricotta cheese, which lighten the texture and help hold everything together. The almond or vanilla extract infuses the mixture with a delicate fragrance, while the pinch of salt and lemon zest brighten and balance the flavors beautifully. Once mixed, cover this tasty filling and chill it in the refrigerator until you’re ready to assemble your danishes—a crucial step to keep everything fresh and firm.
Step 2: Prepare the Puff Pastry
Preheat your oven to 350°F (175°C) and prepare two baking sheets with parchment paper to ensure the danishes bake evenly without sticking. Lightly dust your workspace with flour to make rolling out the puff pastry easier and smoother. Roll each sheet gently just enough to smooth the edges, then cut each into nine equal squares. This portioning helps maintain an ideal size for individual danishes, perfect for sharing or enjoying all to yourself.
Step 3: Assemble the Danishes
Place the puff pastry squares neatly on the lined sheets with enough space between each to puff up beautifully. Use the back of a spoon or your fingertips to press gently into the center of each square, creating little wells that will hold the filling without spilling over during baking. Start with a generous tablespoon of the chilled cheese mixture in each indentation, then top it with a spoonful of the cherry pie filling. That sweet-tart cherry topping paired with the creamy cheese base is the magic that makes this Cherry Cheese Danish Recipe truly memorable.
Step 4: Add the Egg Wash
Brush the exposed edges of each pastry square with the egg wash. This simple step gives the puff pastry its stunning golden sheen and crisp finish, ensuring your danishes look as tempting as they taste once they come out of the oven.
Step 5: Bake the Danishes
Slide your trays into the preheated oven and bake for about 20 to 25 minutes. Watch as the pastry puffs up and transforms into a beautiful golden brown. When done, remove the danishes and let them cool slightly on a wire rack—this little rest helps set the structure and keeps the flaky layers from becoming soggy, preparing them perfectly for the first delicious bite.
How to Serve Cherry Cheese Danish Recipe
Garnishes
A dusting of powdered sugar or a light drizzle of icing glaze adds a touch of elegance and sweetness that complements the tangy cherries and creamy cheese. Fresh mint leaves or thin lemon zest curls can also brighten the presentation and add subtle freshness that enhances the overall flavor profile.
Side Dishes
These danishes pair wonderfully with a cup of rich coffee or your favorite black tea, making them perfect for a cozy breakfast or brunch setting. For a heartier meal, serve alongside fresh fruit salad or a bowl of Greek yogurt to add balance and contrast to the richness of the danishes.
Creative Ways to Present
Arrange your Cherry Cheese Danish Recipe on a rustic wooden board or a colorful serving platter surrounded by fresh cherries or edible flowers for a stunning visual impact. Consider serving each danish with a small dollop of whipped cream or a scoop of vanilla ice cream for a delightful dessert twist that will wow your guests.
Make Ahead and Storage
Storing Leftovers
If you’re lucky enough to have leftovers, store your danishes in an airtight container at room temperature for up to two days. This keeps the pastry flaky while the filling stays fresh and creamy. Avoid refrigeration if possible, as the puff pastry can lose its crispness and become soggy.
Freezing
You can freeze these danishes before baking for a convenient future treat. Assemble them, place on a baking sheet to freeze individually, and then transfer to a freezer-safe bag or container. When you’re ready to enjoy, bake directly from frozen, adding a few extra minutes to the baking time to achieve that perfect golden crust.
Reheating
To bring your leftover danishes back to life, reheat them in a preheated oven at 325°F (160°C) for 5 to 10 minutes. This reheating method crisps the pastry without drying out the filling, preserving the delightful texture and flavors of your Cherry Cheese Danish Recipe.
FAQs
Can I use fresh cherries instead of canned cherry pie filling?
Absolutely! Fresh cherries can be a wonderful substitute and will give your danishes a more natural, less sweet flavor. Just be sure to pit them and cook them down slightly with sugar to mimic the texture of pie filling so they don’t release too much liquid.
Is there a dairy-free version of this Cherry Cheese Danish Recipe?
Yes, you can use dairy-free cream cheese and ricotta alternatives along with a non-dairy puff pastry to make this recipe vegan-friendly. The texture might differ slightly, but the flavors will still shine through beautifully.
How do I prevent the puff pastry from becoming soggy?
Creating an indentation in the center of the pastry before adding the filling and chilling the cheese mixture help prevent sogginess. Additionally, don’t overload the filling and bake at the correct temperature to maintain that crispy, flaky texture.
Can I make mini danishes with this recipe?
Definitely! Just cut the puff pastry squares smaller or use cookie cutters to create different shapes. Keep baking time slightly shorter and monitor closely to avoid burning.
What’s the best way to serve these danishes for a party?
Serve them warm or at room temperature on a beautiful platter, garnished with fresh cherries and powdered sugar. Provide small plates and napkins so guests can easily enjoy these crowd-pleasers without any mess.
Final Thoughts
This Cherry Cheese Danish Recipe has quickly become one of my all-time favorite treats because it hits every note—from the flaky, buttery crust to the luscious, creamy cheese and that perfect pop of cherry sweetness. It’s an easy recipe that turns simple ingredients into something spectacular, perfect for treating yourself or impressing friends. I can’t wait for you to try it and watch your loved ones’ faces light up with each bite!
Print
Cherry Cheese Danish Recipe
- Prep Time: 15 minutes
- Cook Time: 25 minutes
- Total Time: 40 minutes
- Yield: 18 servings
- Category: Breakfast Pastry
- Method: Baking
- Cuisine: American
Description
Delightful Cherry Cheese Danish featuring a creamy cheese filling topped with vibrant cherry pie filling, all encased in flaky, golden puff pastry. Perfect for breakfast, brunch, or a sweet treat.
Ingredients
Cheese Filling
- 4 oz cream cheese, softened
- ¼ cup sugar
- 1 egg yolk
- 1 tablespoon ricotta cheese
- ½ teaspoon almond extract (or vanilla extract)
- Pinch of salt
- ½ tablespoon lemon zest
Puff Pastry
- 2 sheets puff pastry (1 box), thawed
- Flour (for dusting)
Topping and Finishing
- 1 can cherry pie filling
- 1 large egg, beaten with 1 tablespoon of water (egg wash)
Instructions
- Prepare the Cheese Filling: In a medium bowl, blend the softened cream cheese and sugar using an electric mixer until smooth. Add the egg yolk, ricotta cheese, almond or vanilla extract, salt, and lemon zest. Mix well to combine. Cover and refrigerate until ready to assemble.
- Prepare the Puff Pastry: Preheat oven to 350°F (175°C). Line two baking sheets with parchment paper. Lightly dust a work surface with flour and roll out the puff pastry sheets slightly to smooth the edges. Cut each sheet into 9 equal squares, totaling 18 squares.
- Assemble the Danishes: Place puff pastry squares on prepared baking sheets, spacing evenly. Press the center of each square slightly to create an indentation for the filling. Spoon about 1 tablespoon of the cheese mixture into each center, then top with a spoonful of cherry pie filling.
- Add the Egg Wash: Brush the edges of each danish with the beaten egg and water mixture to ensure a glossy, golden finish.
- Bake the Danishes: Bake in the preheated oven for 20-25 minutes or until the puff pastry is risen and golden brown. Remove from oven and cool slightly on wire racks before serving.
Notes
- For best results, keep puff pastry chilled until ready to use to ensure flakiness.
- Almond extract can be substituted with vanilla extract if preferred.
- Use a sharp knife or pizza cutter to cut puff pastry squares for clean edges.
- Allow danishes to cool slightly before serving to let the filling set.
- These danishes can be stored in an airtight container for up to 2 days and reheated gently before serving.


