
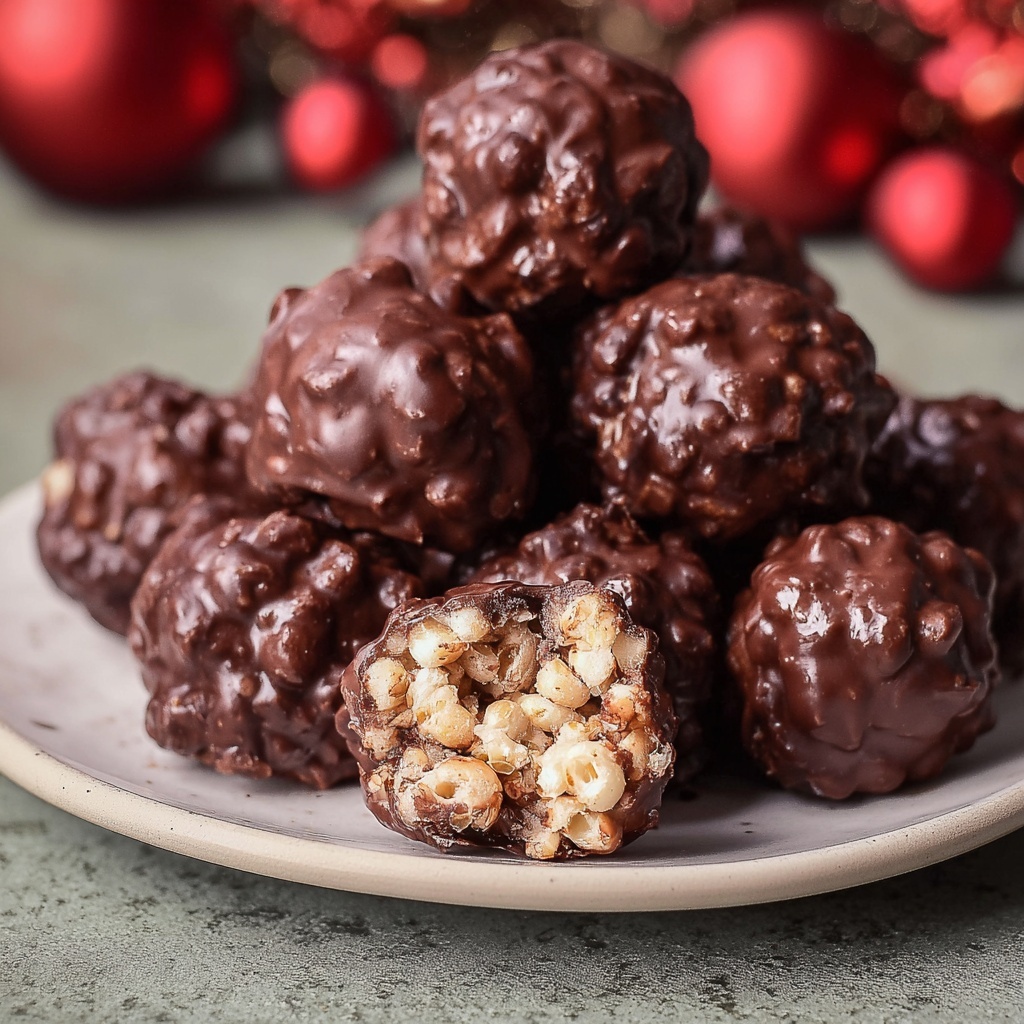
If you’ve ever dreamed of a treat that’s crunchy, chocolatey, and melts in your mouth with every bite, then this Chocolate Rice Krispie Balls Recipe is about to become your new go-to dessert. These bite-sized delights combine the nostalgic crunch of Rice Krispies cereal with the creamy richness of peanut butter and a luscious chocolate coating that makes every mouthful unforgettable. They’re perfect for sharing at parties, gifting to friends, or just sneaking a sweet moment all to yourself.

Ingredients You’ll Need
This recipe calls for a handful of simple yet absolutely essential ingredients, each bringing their own magic to the mix. From peanut butter lending a creamy, nutty base to the light, crispy texture of Rice Krispies, every component plays a key role in creating the perfect balance of flavors and textures.
- Peanut butter: Provides a rich, creamy flavor and helps bind the ingredients together smoothly.
- Soft butter: Adds a subtle richness and smoothness that balances the peanut butter.
- Vanilla extract: Enhances the overall flavor and adds a warm, comforting aroma.
- Rice Krispies cereal: The star of the show, delivering crisp, airy texture that makes these balls delightfully crunchy.
- Powdered sugar: Adds sweetness and helps firm up the mixture for easier rolling.
- Chocolate chips: Perfect for melting into a smooth, shiny coating that creates a luscious outer shell.
- Coconut oil (optional): Helps to create a smoother, glossier chocolate coating without altering the taste.
How to Make Chocolate Rice Krispie Balls Recipe
Step 1: Prepare the base mixture
Start by combining the peanut butter, soft butter, vanilla extract, and powdered sugar in a medium bowl. Mixing these ingredients until smooth creates a creamy base with just the right sweetness and richness to hold everything together. The texture should be smooth and slightly thick, perfect for folding in the cereal gently.
Step 2: Fold in the Rice Krispies cereal
Gently fold the Rice Krispies into the peanut butter mixture. The key here is to combine without crushing the cereal to maintain that essential crunch. This step sets the stage for the light and airy texture of your final balls, so patience and a delicate touch really pay off.
Step 3: Shape into balls
Using a tablespoon or your hands, scoop out portions of the mixture and roll them into neat balls. Placing each one on a parchment-lined baking sheet ensures they won’t stick and will chill evenly. The uniform size makes dipping and serving easier later on.
Step 4: Chill until firm
Pop the tray into the refrigerator for about 30 minutes. This step is crucial as it firms up the balls, making them easier to handle when coating with chocolate. The cooler temperature also helps the shape hold better for that perfect presentation.
Step 5: Melt the chocolate coating
In a microwave-safe bowl, melt the chocolate chips together with the optional coconut oil in 20-second bursts, stirring in between. This gentle melting method ensures a silky smooth coating without burning the chocolate. The coconut oil adds a beautiful sheen and helps the chocolate set to a lovely snap.
Step 6: Dip and coat each ball
One by one, dip each chilled ball into the melted chocolate, ensuring every bit is covered in that glossy layer. Returning them to the parchment-lined sheet after dipping keeps things tidy and allows the chocolate to solidify beautifully.
Step 7: Final chill and serve
Once all the balls are coated, chill them again for 15 to 20 minutes until the chocolate has fully set. This final step locks in all the flavors and gives each Chocolate Rice Krispie Ball a perfect finish that’s irresistible to bite into.
How to Serve Chocolate Rice Krispie Balls Recipe
Garnishes
While these balls are delightful on their own, adding a sprinkle of crushed nuts, colorful sprinkles, or a drizzle of white chocolate can elevate their appearance and add an extra pop of flavor. Fresh mint leaves or a tiny dusting of cocoa powder also bring a fresh contrast that’s visually stunning.
Side Dishes
Pair them with a cold glass of milk, a steaming cup of coffee, or even a scoop of vanilla ice cream for a dessert experience that caters to all ages and tastes. Their light crunch complements creamy or frothy beverages perfectly.
Creative Ways to Present
Try arranging Chocolate Rice Krispie Balls Recipe on a festive platter wrapped in colorful cellophane for parties or gifts. You can also skewer them alongside fresh fruit or place them in mini cupcake liners for easy portioning at gatherings. Their bite-sized nature makes them super versatile and fun to share.
Make Ahead and Storage
Storing Leftovers
These rice krispie balls keep wonderfully in an airtight container in the refrigerator for up to a week. Keeping them chilled preserves their crunch and maintains the chocolate’s glossy coating.
Freezing
If you want to enjoy them later or prepare in advance, freeze the balls in a single layer on a baking sheet before transferring to a sealed container. They can be frozen for up to a month. Just thaw in the refrigerator before serving to bring back their perfect texture.
Reheating
Since these are best enjoyed cold or at room temperature, reheating isn’t recommended. Instead, allow frozen balls to thaw gently so the chocolate doesn’t melt prematurely, ensuring you get that satisfying crunch with every bite.
FAQs
Can I use a different type of nut butter?
Absolutely! Almond butter or cashew butter can be great substitutes, offering a different flavor profile but similar creamy texture. Just make sure to use a smooth variety for easy mixing.
How do I keep the chocolate from melting on warm days?
Keep the balls refrigerated until serving and consider storing them in a cool, air-conditioned room. Using coconut oil in the chocolate coating also helps the chocolate set firmly and resist melting.
Can I add extras like nuts or dried fruit?
Yes, folding in chopped nuts, mini marshmallows, or dried cranberries can add extra texture and flavor to your Chocolate Rice Krispie Balls Recipe. Just be careful not to overload the mixture to maintain the right consistency.
What if I don’t have a microwave to melt the chocolate?
No problem! Use a double boiler method on the stovetop to melt your chocolate chips gently. Stir continuously to prevent scorching and achieve that perfect silky coating.
Are these safe for kids to help make?
Definitely! This recipe is kid-friendly and a fun hands-on activity. Just supervise when handling the melted chocolate, and let the little chefs enjoy rolling and decorating their treats.
Final Thoughts
Making these Chocolate Rice Krispie Balls Recipe brings a wonderful sense of joy and nostalgia, wrapped up in a fresh, chocolatey twist that everyone will love. Whether you’re whipping them up for a festive occasion or a cozy treat, these little bites of happiness are sure to brighten your day. Give this recipe a try and watch how they quickly become a cherished favorite in your collection!
Print
Chocolate Rice Krispie Balls Recipe
- Prep Time: 15 minutes
- Cook Time: 0 minutes
- Total Time: 1 hour 10 minutes
- Yield: 12 servings
- Category: Dessert
- Method: No-Cook
- Cuisine: American
Description
Delightfully sweet and crunchy Chocolate Rice Krispie Balls featuring a smooth peanut butter base coated in rich melted chocolate, perfect as an easy no-bake treat for any occasion.
Ingredients
Main Ingredients
- 1/2 cup peanut butter
- 3 tablespoons soft butter
- 1 teaspoon vanilla extract
- 1 cup Rice Krispies cereal
- 1/2 cup powdered sugar
Coating Ingredients
- 1/2 cup chocolate chips
- 1 teaspoon coconut oil (optional, for smoother coating)
Instructions
- Mix Wet Ingredients: In a medium bowl, combine the peanut butter, soft butter, vanilla extract, and powdered sugar. Stir thoroughly until the mixture becomes smooth and creamy, ensuring everything is well blended for the perfect base texture.
- Fold in Cereal: Gently fold the Rice Krispies cereal into the peanut butter mixture, taking care not to crush the cereal. This step keeps the cereal intact, maintaining the crunchy texture in every bite.
- Form Balls: Using a tablespoon or a small scoop, take portions of the mixture and roll them between your palms to form compact balls. Place each ball on a parchment-lined baking sheet, spacing them out evenly.
- Chill the Balls: Refrigerate the formed balls for about 30 minutes to firm up, which makes dipping them easier and less messy.
- Melt Chocolate Coating: In a microwave-safe bowl, melt the chocolate chips along with the optional coconut oil in 20-second intervals. Stir well after each interval until the chocolate is smooth and glossy, perfect for coating.
- Coat the Balls: Dip each chilled Rice Krispie ball into the melted chocolate, using a fork or spoon to ensure it’s evenly coated. Allow excess chocolate to drip off and then return the balls to the parchment-lined sheet.
- Final Chill: Place the chocolate-coated balls back in the refrigerator and chill for 15 to 20 minutes until the chocolate hardens completely. Once set, they are ready to serve. Enjoy your delicious homemade treat!
Notes
- For a dairy-free version, substitute butter with vegan margarine or coconut oil.
- Ensure the peanut butter is smooth for the best mixing consistency.
- If coconut oil is not available, omit it; the chocolate might be slightly less smooth but will still taste great.
- Store leftovers in an airtight container in the refrigerator for up to a week.
- To add variety, try sprinkling crushed nuts or sea salt on top right after dipping in chocolate before chilling.


