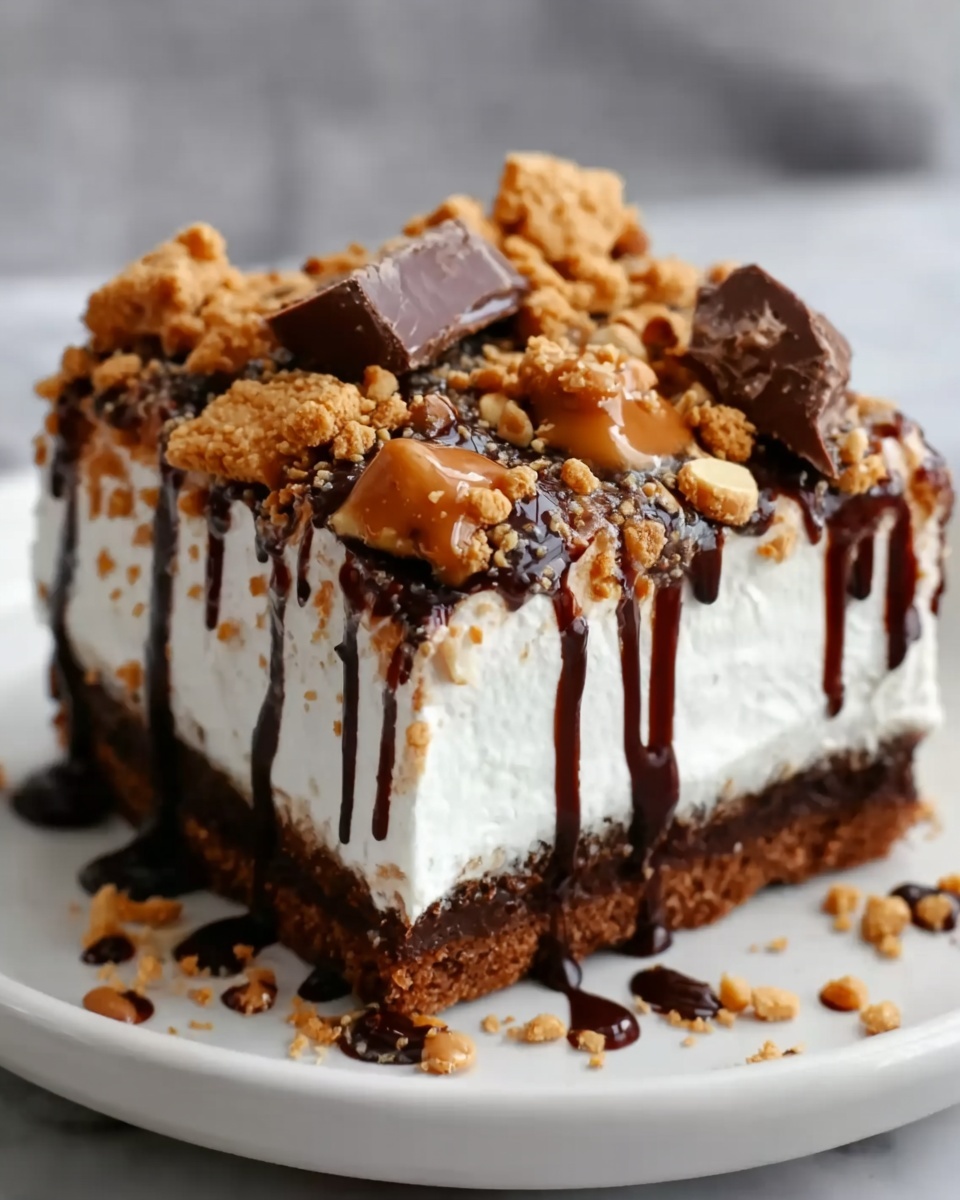
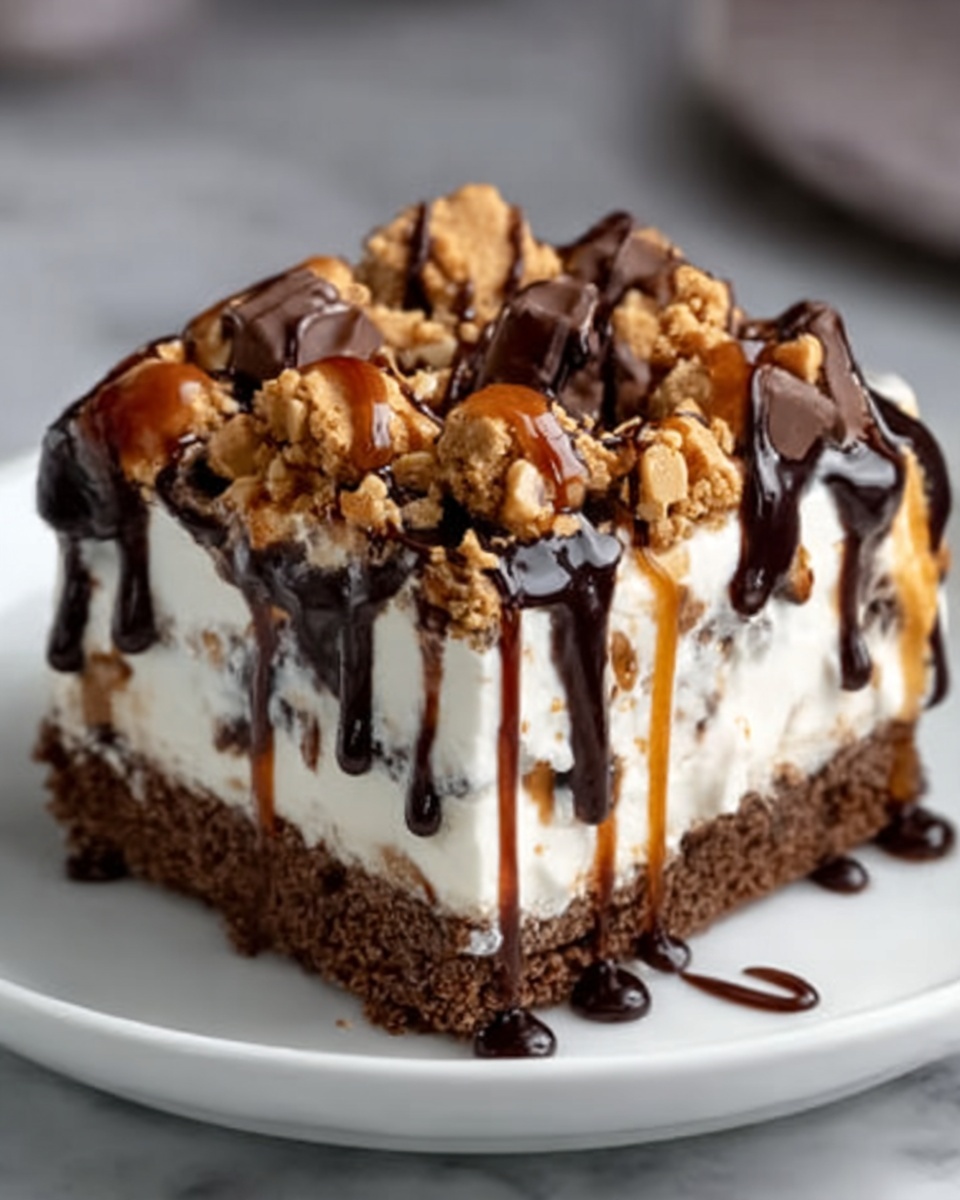
If you have a sweet tooth that appreciates the perfect combo of rich chocolate, creamy pudding, and a satisfying crunch, you are going to adore this Butterfinger Candy Bar Poke Cake Recipe. It’s a luscious dessert that combines the moistness of a classic cake with the delightful texture of chopped Butterfinger bars, all topped with creamy, dreamy layers. Whether you’re making it for a celebration or a casual family dessert, this recipe turns simple ingredients into a show-stopping treat you’ll want to share again and again.
Ingredients You’ll Need
The beauty of this Butterfinger Candy Bar Poke Cake Recipe lies in how straightforward the ingredient list is, yet how each component plays a crucial role in building layers of flavor and texture. From the moist cake base to the fluffy pudding filling and the irresistible candy crunch, every item is essential.
- 1 box chocolate or vanilla cake mix: Your base, providing a moist and flavorful cake foundation, flexible depending on your flavor preference.
- 1 package instant pudding mix (vanilla or chocolate): Creates the luscious, creamy filling that seeps into every nook.
- 2 cups cold milk: Needed to prepare the pudding and balance the sweetness.
- 1 can (14 oz) sweetened condensed milk: Adds rich sweetness and creaminess to the pudding layer.
- 1 tub (8 oz) whipped topping (Cool Whip), thawed: Lightens the pudding mixture for a fluffy, airy texture.
- 4–5 Butterfinger candy bars, chopped: The star ingredient providing a buttery, crunchy surprise topping.
- Butter and sugar: Optional, used to enhance richness in the cake batter or sprinkled over the top.
- Peanut butter: For drizzling, adds a nutty depth and pairs perfectly with Butterfinger flavors.
- Caramel sauce: For drizzling, giving a sweet, sticky finish that contrasts beautifully with the crunch.
How to Make Butterfinger Candy Bar Poke Cake Recipe
Step 1: Bake Your Cake Base
Start by preparing your chosen boxed cake mix exactly as the box instructs, whether chocolate or vanilla. Pour the batter into a greased 9×13-inch pan and pop it in the oven. Once the cake is out and slightly cooled—still warm but easy to handle—you’re ready to move on.
Step 2: Poke for Perfection
Using a wooden spoon handle or a skewer, poke evenly spaced holes all over the cake’s surface. This technique is more than a quirky step—it’s what allows the decadent pudding filling to seep deep into the cake, ensuring every bite is moist and bursting with flavor.
Step 3: Whip Up the Creamy Filling
In a bowl, whisk your instant pudding mix with cold milk until thick and silky. Then stir in the sweetened condensed milk, which boosts sweetness and richness. Finally, gently fold in the thawed whipped topping to lighten the mixture, giving you that perfect creamy texture.
Step 4: Drizzle the Filling Over Cake
Slowly pour or spoon the pudding filling over your poked cake, making sure it seeps into all the holes and covers the cake evenly. This step is where the magic happens as the cake absorbs all that creamy goodness, creating layers of flavor and moisture.
Step 5: Chill and Add Your Toppings
Cover the cake with plastic wrap and chill it for at least two hours, allowing the filling to set and the flavors to meld beautifully. When you’re ready to serve, sprinkle generously with chopped Butterfinger bars for that much-loved crunch. Don’t forget a drizzle of peanut butter and caramel sauce to take it to the next level.
How to Serve Butterfinger Candy Bar Poke Cake Recipe

Garnishes
Enhance your Butterfinger Candy Bar Poke Cake Recipe with extra flair by adding a few garnishes. Fresh whipped cream dollops, a light sprinkle of crushed peanuts, or an extra drizzle of caramel and peanut butter sauce make each slice feel indulgent and inviting.
Side Dishes
This rich dessert pairs wonderfully with a simple side of fresh berries to cut through the sweetness, or a scoop of vanilla ice cream to complement the creamy cake layers. A hot cup of coffee or a glass of cold milk is also a fantastic choice to balance those flavors.
Creative Ways to Present
Serve slices on pretty dessert plates with a little extra crunch on top for texture contrast. For parties, consider cutting the cake into smaller squares and serving them in mini cupcake liners with a drizzle of peanut butter and caramel. It’s as delightful to look at as it is to eat!
Make Ahead and Storage
Storing Leftovers
Store leftover cake covered tightly with plastic wrap or in an airtight container in the refrigerator. The flavors actually improve after a day or two, making it even more delicious when enjoyed later.
Freezing
You can freeze this poke cake if you need to prep in advance. Wrap it securely in plastic wrap and then foil to protect against freezer burn. Thaw overnight in the fridge before serving to maintain that luscious texture.
Reheating
As this is a chilled dessert, it’s best enjoyed cold and doesn’t require reheating. If you’d like a softer texture, allow it to come to room temperature for about 15 minutes before serving.
FAQs
Can I use homemade cake instead of boxed mix for this Butterfinger Candy Bar Poke Cake Recipe?
Absolutely! Homemade cake works wonderfully and lets you customize flavors even more. Just be sure it’s sturdy enough to hold up when poked and soaked with filling.
What can I substitute for instant pudding mix?
If instant pudding isn’t available, you can make a homemade custard or mousse that thickens well and mix it with whipped topping for similar results.
Do the Butterfinger candy bars need to be fresh or can I use leftovers?
Fresh Butterfinger bars are best for that ideal crunch, but leftovers will work too as long as they’re not stale. Just chop them up evenly for a consistent texture.
How long should I chill the cake before serving?
Chilling for at least 2 hours is important for the filling to set properly and for flavors to meld, but refrigerating overnight can enhance the taste and texture even more.
Can I make this cake gluten-free?
Yes, if you use a gluten-free cake mix, this recipe can be adapted for gluten-sensitive diets while keeping the same amazing flavor and texture.
Final Thoughts
This Butterfinger Candy Bar Poke Cake Recipe is one of those desserts that feels like a warm hug and a celebration all in one. Its irresistible blend of textures and flavors is sure to become a treasured favorite in your recipe collection. Don’t wait for a special occasion—grab your ingredients and make this cake today to share some sweet joy with those you love.
Print
Butterfinger Candy Bar Poke Cake Recipe
- Prep Time: 20 minutes
- Cook Time: 35 minutes
- Total Time: 3 hours 30 minutes
- Yield: 12 servings
- Category: Dessert
- Method: Baking
- Cuisine: American
Description
This Butterfinger Candy Bar Poke Cake is a decadent, crowd-pleasing dessert that combines moist chocolate or vanilla cake with a creamy, sweet pudding filling infused with sweetened condensed milk and whipped topping. The cake is poked with holes to allow the luscious pudding mixture to seep in for every bite, then topped with crunchy chopped Butterfinger candy bars and drizzles of peanut butter and caramel sauce for an irresistible combination of flavors and textures. Perfect for parties or special occasions, this poke cake is rich, creamy, and delightfully crunchy.
Ingredients
Cake
- 1 box chocolate or vanilla cake mix (plus ingredients needed according to box instructions)
- Butter and sugar (optional, for extra richness in cake base or topping)
Filling
- 1 package instant pudding mix (vanilla or chocolate)
- 2 cups cold milk
- 1 can (14 oz) sweetened condensed milk
- 1 tub (8 oz) whipped topping (Cool Whip), thawed
Toppings
- 4–5 Butterfinger candy bars, chopped
- Peanut butter (for drizzle)
- Caramel sauce (for drizzling)
Instructions
- Bake the Cake: Prepare your boxed cake mix according to package instructions. Pour the batter into a greased 9×13-inch baking pan and bake as directed on the box. Once done, remove the cake from the oven and allow it to cool slightly until it is warm but manageable to touch.
- Poke Holes in the Cake: Using the handle of a wooden spoon or a skewer, poke holes evenly spaced across the entire surface of the warm cake. These holes allow the filling to seep into the cake, enhancing moisture and flavor throughout.
- Prepare the Filling: In a mixing bowl, whisk the instant pudding mix with 2 cups of cold milk until the mixture thickens. Then, stir in the sweetened condensed milk until fully combined. Gently fold in the thawed whipped topping, mixing carefully to maintain a light and fluffy texture.
- Pour Filling Over Cake: Slowly pour or spoon the creamy pudding mixture evenly over the cake, ensuring the filling seeps into all the poke holes and covers the surface completely for maximum flavor absorption.
- Chill and Apply Toppings: Cover the cake with plastic wrap and refrigerate for at least 2 hours to allow the filling to set. Before serving, sprinkle generously with chopped Butterfinger candy bars for a crunchy finish. Optionally, drizzle peanut butter and caramel sauce over the top to enhance flavor even further before serving.
Notes
- Use either chocolate or vanilla cake mix depending on your flavor preference.
- For best results, poke holes while the cake is still warm so that the filling seeps deeply.
- The pudding filling can be made with vanilla or chocolate instant pudding for variety.
- Allow the cake to chill for at least 2 hours or longer for the best texture and flavor melding.
- Feel free to adjust the quantity of Butterfinger candy bars based on your desired crunch.
- If you prefer, you can lightly butter and sprinkle sugar on the cake before baking for a slightly richer crust.
- Store leftovers covered in the refrigerator and consume within 3-4 days.

