If you’re looking for a delightful treat that perfectly captures the spirit of spring and fun family moments, then this Easy Easter Nest Cookies Recipe is your new best friend in the kitchen. These charming little nests, packed with rich chocolate flavor, chewy oats, and a hint of coconut, are crowned with colorful chocolate eggs that bring joy to both kids and adults alike. Not only do they look adorable, but they’re incredibly simple to make, requiring no baking—just a little stirring, shaping, and chilling. Whether you’re prepping for an Easter party or craving a nostalgic, sweet snack, these cookies blend texture, taste, and festive appeal into one irresistible bite.

Ingredients You’ll Need
The beauty of this Easy Easter Nest Cookies Recipe lies in its straightforward and wholesome ingredients. Each one contributes to creating the perfect balance of flavor and texture: creamy butter and rich cocoa provide a luscious chocolatey base, milk keeps the mixture smooth, oats add that hearty chew, and coconut brings a subtle tropical twist. Finally, eye-catching chocolate eggs add that classic Easter charm and a pop of sweetness.
- ½ cup unsalted butter: Gives the cookies a rich, creamy texture and helps bind everything together.
- ½ cup milk: Keeps the mixture smooth and lends moisture without overpowering the chocolate flavor.
- 2 cups granulated sugar: Sweetens the cookies perfectly, balancing the cocoa’s bitterness.
- ½ cup cocoa powder: Adds that deep, chocolaty goodness that makes these nests irresistible.
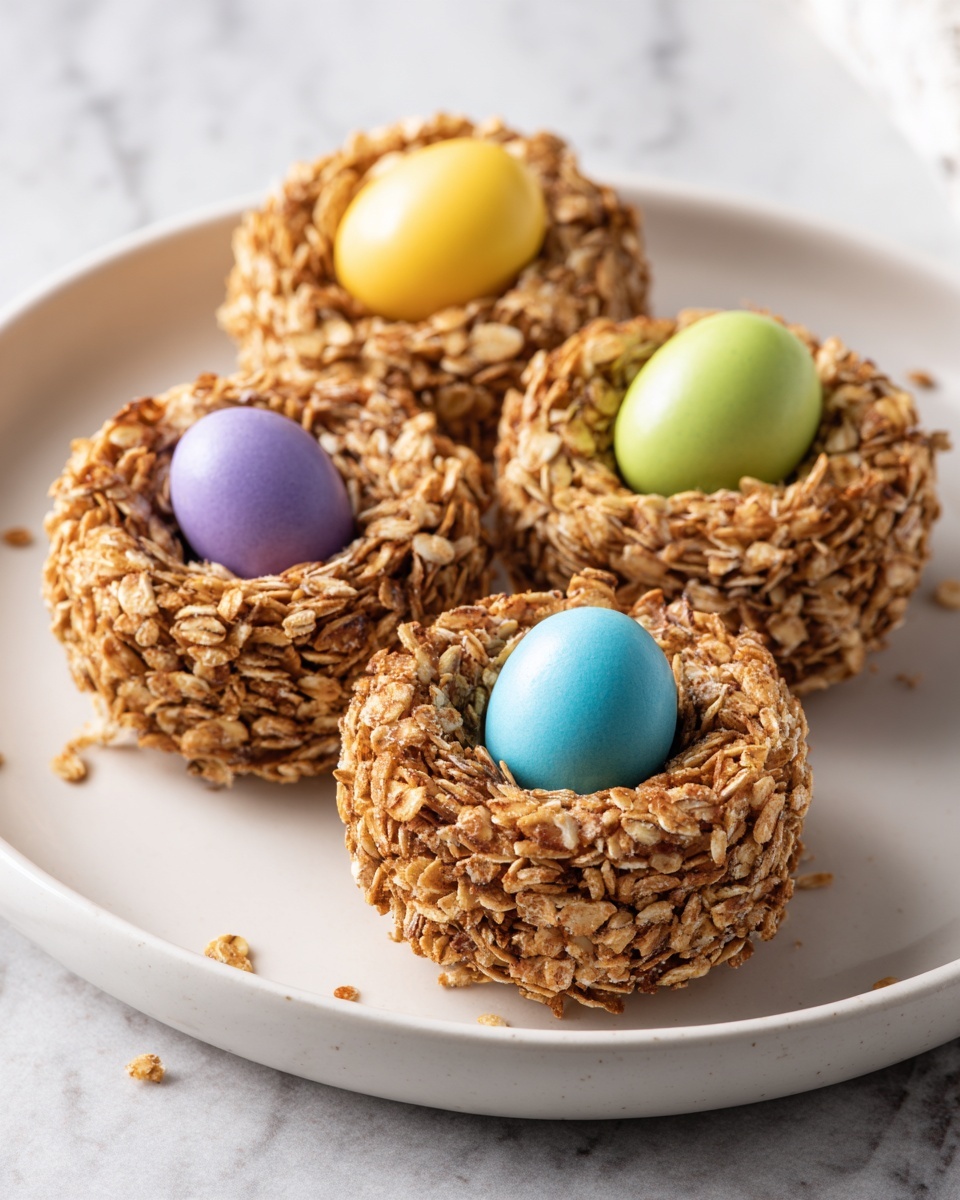
- 3 cups rolled oats (old-fashioned or quick-cooking): Provides chewiness and a wholesome bite, essential for those “nest” textures.
- 1 cup shredded coconut: Brings a subtle, nutty sweetness and light texture contrast.
- Chocolate eggs (such as Cadbury Mini Eggs or Whoppers Robin Eggs): The festive topping that makes each cookie look like a springtime nest.
How to Make Easy Easter Nest Cookies Recipe
Step 1: Prep and Cook the Chocolate Mixture
Start by lining your baking sheets with wax paper — this makes the cleanup a breeze and prevents sticking. In a medium saucepan, melt the butter with milk, sugar, and cocoa powder over medium heat. Keep whisking constantly to combine everything smoothly and prevent any lumps. Once the mixture comes to a gentle boil, let it cook for 5 minutes while stirring continuously to thicken the sauce. This step creates a rich, glossy base that clings beautifully to the oats and coconut.
Step 2: Combine with Oats and Coconut
Remove the saucepan from the heat and immediately stir in the rolled oats and shredded coconut. Mixing quickly and thoroughly is key here to make sure every oat and flake is coated in that luscious chocolate mixture. The oats give body and chewiness, while the coconut adds a delicate flavor and texture contrast that elevates these cookies beyond your average no-bake treats.
Step 3: Shape Your Nests
Using a tablespoon, drop portions of the mixture onto your wax-paper-lined sheets. Before the chocolate sets, gently press a small indentation into the center of each mound to create the “nest” shape. Then nestle 2-3 chocolate eggs right into the center of each one. If you like, mold the cookie edges slightly upward with your fingers to enhance the nest look. This hands-on step not only makes the cookies look adorable but also ensures that each bite has the perfect ratio of crunchy oats and gooey chocolate.
Step 4: Chill and Set
Pop the trays into the refrigerator for about 45 minutes to allow the cookies to firm up. This chilling time is crucial because it lets the butter solidify and the nests become sturdy enough to pick up without losing their shape. Once set, these little beauties are ready to delight your taste buds and become the star of your Easter celebration.
How to Serve Easy Easter Nest Cookies Recipe

Garnishes
While the chocolate eggs themselves offer festive flair, you can elevate presentation by dusting the cookies with a light sprinkle of powdered sugar for a “morning dew” effect. Fresh mint leaves placed alongside the nests add a refreshing note and pretty pop of green. For a touch of extra indulgence, drizzle some melted white or milk chocolate over the nests just before serving.
Side Dishes
These cookies pair wonderfully with simple accompaniments. A glass of cold milk or a rich hot chocolate makes a perfect beverage companion, enhancing the chocolate flavors. If serving at a brunch or party, pair them with fresh berries or a light citrus fruit salad to balance the sweetness and introduce some bright freshness to your dessert spread.
Creative Ways to Present
For an unforgettable Easter table, place the nests on decorative pastel-colored cupcake liners to make each cookie pop with color. Arrange them on a tiered cake stand surrounded by spring flowers for a charming centerpiece. You can also package them individually in small cellophane bags tied with ribbons for party favors or a sweet Easter gift that friends and family will adore.
Make Ahead and Storage
Storing Leftovers
These cookies stay fresh and delicious when stored in an airtight container at room temperature for up to 3 days. Keep them in a cool, dry place away from direct sunlight to maintain the chocolate’s sheen and prevent the coconut from drying out.
Freezing
If you want to prepare your Easy Easter Nest Cookies Recipe in advance for a larger gathering, freezing works well. Arrange the nests in a single layer on a baking sheet and freeze until firm, then transfer them to a freezer-safe container with parchment paper between layers. They can be frozen for up to 1 month. Thaw in the refrigerator before serving to keep the eggs intact and the texture just right.
Reheating
Since these nests are no-bake and best enjoyed chilled, reheating is not recommended. However, if you prefer a slightly softer texture, allow them to sit at room temperature for 10–15 minutes before eating. This subtle warming will soften the chocolate slightly without losing the nest shape.
FAQs
Can I use quick oats instead of old-fashioned oats for these nests?
Absolutely! Quick-cooking oats will work fine and may even give a slightly softer texture, but old-fashioned oats are preferred if you like a bit more chew in your nests.
What can I substitute for shredded coconut if I don’t like it?
You can omit the coconut or replace it with chopped nuts like almonds or pecans for an added crunch and nutty flavor. Just keep the measurement the same for best results.
Will these nests stay fresh if left out overnight?
They should be fine if stored in an airtight container overnight at room temperature, but for optimal freshness and texture, refrigeration is recommended especially in warm or humid climates.
Can I make these nests gluten-free?
Yes! Just make sure to use certified gluten-free oats. This swap keeps the texture intact while making the recipe safe for gluten-sensitive guests.
Are there vegan options for this recipe?
You can try using a plant-based butter and a non-dairy milk such as almond or oat milk. Make sure the chocolate eggs you use are also vegan-friendly. This way, you’ll keep the magic of the nests while accommodating vegan diets.
Final Thoughts
This Easy Easter Nest Cookies Recipe is such a joyful and simple way to bring a little festive sweetness into your home. It’s one of those recipes that delivers big smiles with minimal fuss, making it perfect for kids to help prepare or for a last-minute holiday treat. I encourage you to give it a try this season — mix, shape, chill, and then enjoy the magic of those nostalgic, chocolatey nests decorated with vibrant little eggs. They’re sure to become a beloved tradition, just like they have for me!
Print
Easy Easter Nest Cookies Recipe
- Prep Time: 10 minutes
- Cook Time: 10 minutes
- Total Time: 1 hour
- Yield: 32 servings
- Category: Dessert
- Method: Stovetop
- Cuisine: American
- Diet: Vegetarian
Description
Delightfully easy and festive Easter Nest Cookies made with a rich chocolate oat mixture, shredded coconut, and topped with colorful chocolate eggs. These no-bake treats set in the refrigerator and bring a perfect combination of chewy texture and sweet chocolate flavor, ideal for Easter celebrations or any springtime gathering.
Ingredients
Wet Ingredients
- ½ cup unsalted butter
- ½ cup milk
Dry Ingredients
- 2 cups granulated sugar
- ½ cup cocoa powder
- 3 cups rolled oats (old-fashioned or quick-cooking)
- 1 cup shredded coconut
Toppings
- Chocolate eggs (such as Cadbury Mini Eggs or Whoppers Robin Eggs), 2-3 per cookie
Instructions
- Prep and Cook: Line baking sheets with wax paper. In a medium saucepan, melt the butter, milk, sugar, and cocoa powder together over medium heat, whisking constantly until smooth and combined. Bring the mixture to a gentle boil and cook for 5 minutes, stirring and whisking constantly to prevent burning.
- Combine with Oats and Coconut: Remove the saucepan from the heat. Stir in the rolled oats and shredded coconut thoroughly until the mixture is evenly combined and sticky enough to hold its shape.
- Shape Nests: Using a tablespoon, drop spoonfuls of the mixture onto the prepared baking sheets. Quickly create a small indentation in the center of each mound to form a nest shape. Place 2-3 chocolate eggs into the indentation and gently mold the mixture around them if desired to secure the eggs in place.
- Chill and Serve: Transfer the baking sheets to the refrigerator and chill for about 45 minutes, or until the cookies have set firmly. Once set, carefully peel the cookies off the wax paper and serve fresh for a perfect Easter treat.
Notes
- Use old-fashioned rolled oats for a chewier texture or quick-cooking oats for a slightly softer cookie.
- Ensure you whisk constantly while boiling the chocolate mixture to prevent it from scorching.
- You can substitute the shredded coconut with chopped nuts for a different texture.
- These cookies are best served within 2 days but can be stored in an airtight container in the fridge for up to a week.
- For a dairy-free version, substitute milk and butter with plant-based alternatives.


