
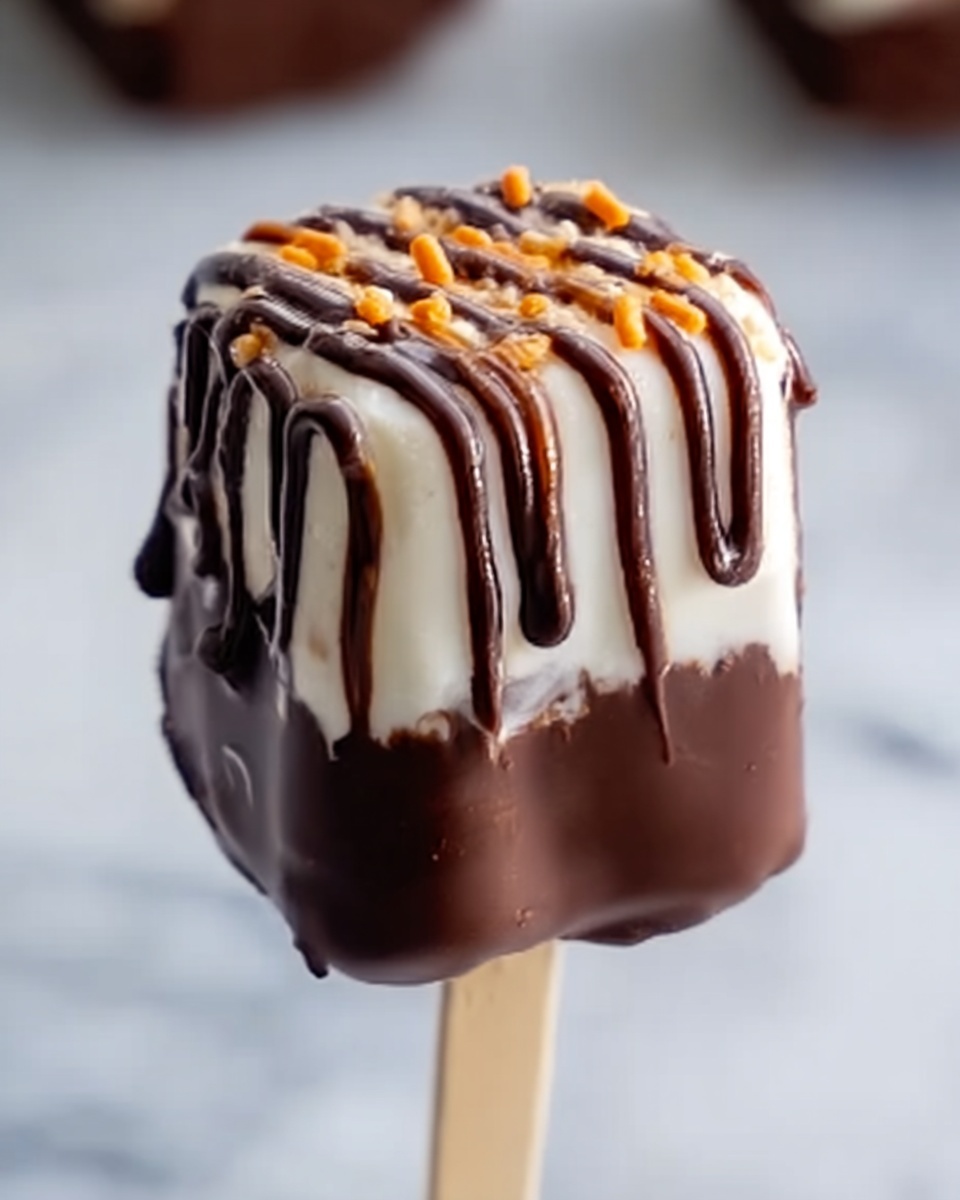
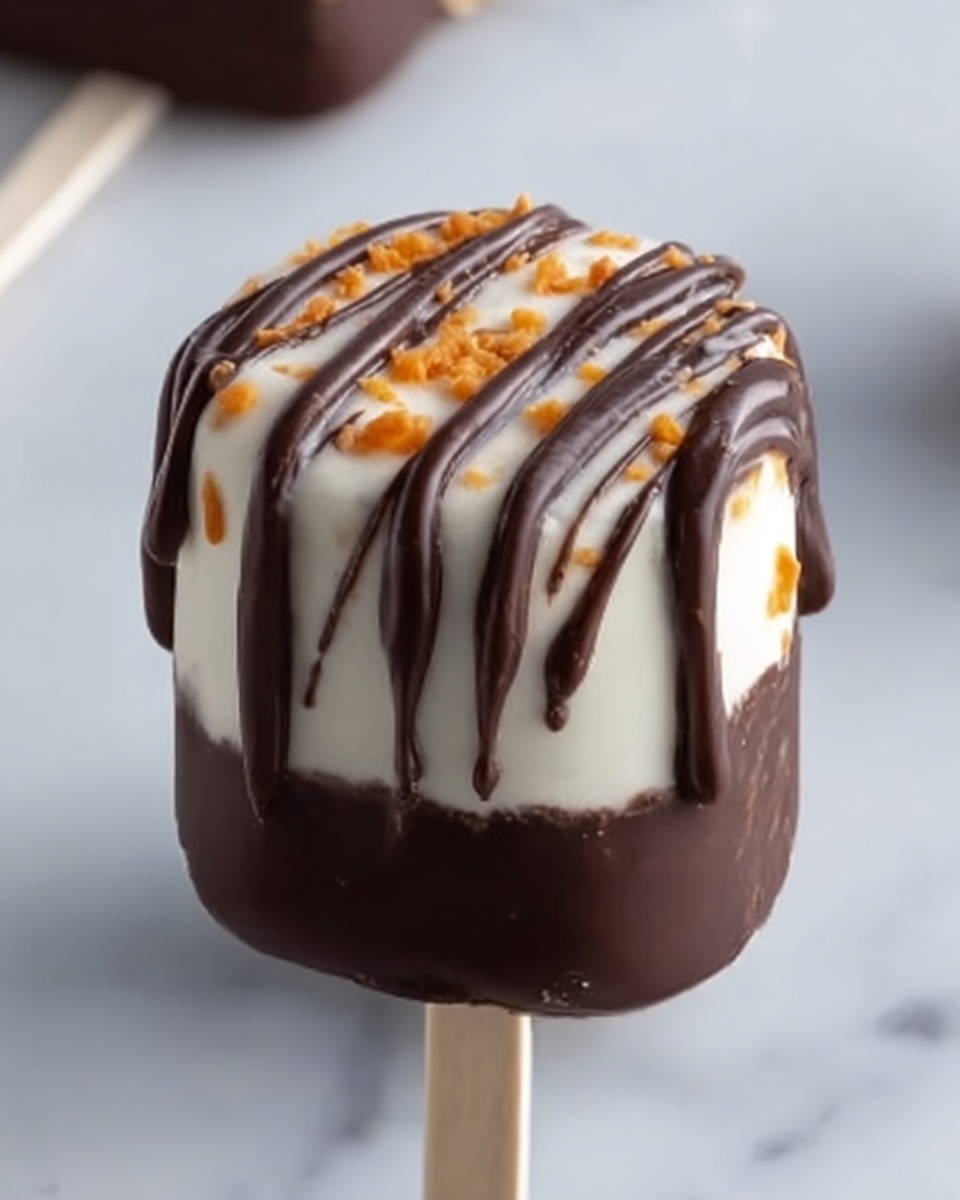
If you’re in the mood for a treat that’s as fun to make as it is to eat, then this Hocus Pocus Pops Recipe is just the magic you need. Picture fluffy marshmallows transformed into dazzling pops coated in silky milk and white chocolate, sprinkled with colorful confetti and shimmering edible glitter. These enchanting creations are perfect for a spooky night, a kid-friendly party, or simply whenever you want to add a little sparkle to your snack time. Not only are they utterly delicious, but they also bring a playful charm that’s guaranteed to make you smile every time you bite into one.
Ingredients You’ll Need
Getting ready to whip up these spellbinding treats is super simple because the ingredients are straightforward, yet each plays an important role in crafting that perfect sweet texture and eye-catching finish.
- 1 cup milk chocolate chips: These melt into a rich, creamy coating that adds classic chocolate sweetness.
- 1 cup white chocolate chips: Their smooth, sweet flavor complements the milk chocolate and creates a lovely contrast.
- 12 large marshmallows: The soft, pillowy center that everyone loves and the perfect base for dipping.
- 12 lollipop sticks: Essential for turning your marshmallows into pops that are easy to hold and dip.
- Assorted sprinkles and edible glitter: The magical finishing touches that bring color, sparkle, and festive fun to each pop.
- Wax paper: Needed for lining the tray to keep your pops from sticking and making cleanup a breeze.
How to Make Hocus Pocus Pops Recipe
Step 1: Prepare Your Workspace
Start by lining a baking sheet with wax paper. This simple step ensures your marshmallow pops will set beautifully without sticking, making the whole process smoother and more enjoyable.
Step 2: Insert Sticks into Marshmallows
Carefully push a lollipop stick into each marshmallow until it’s about halfway in, giving you a sturdy handle to dip and decorate your pops. It’s easier than you might think and sets the stage for the rest of the magic.
Step 3: Melt Your Chocolates
In two separate microwave-safe bowls, melt the milk and white chocolate chips in 30-second intervals. Be sure to stir between each interval for even melting and a luxuriously smooth texture. This dual chocolate approach adds visual appeal and flavor variety that’s simply irresistible.
Step 4: Dip the Marshmallows
Dip half of your marshmallows into the melted milk chocolate, gently tapping off the excess so each pop is coated just right. Place them on your prepared baking sheet to start setting. Then, repeat the same process with the other half using the white chocolate. This step is so satisfying because you can see your treats starting to transform into something special.
Step 5: Decorate with Sprinkles and Glitter
Before the chocolate hardens, unleash your creativity and sprinkle each pop with your chosen decorations. The sprinkles add crunch and color, while the edible glitter gives that enchanting shimmer – perfect for the festive feel of this Hocus Pocus Pops Recipe.
Step 6: Chill and Set
Place your decorated pops in the refrigerator for about 15 minutes. This cooling time allows the chocolate to set firmly, locking in the beautiful decorations and making the pops easy to enjoy without mess.
Step 7: Serve and Enjoy
Once your pops are set and gleaming, they’re ready to be devoured. Share them at your next gathering, gift them to friends, or simply relish them as a magical homemade treat.
How to Serve Hocus Pocus Pops Recipe
Garnishes
For an extra layer of fun, consider drizzling melted contrasting chocolate over the pops or adding tiny themed toppers like edible stars or mini candy eyeballs. These little extras elevate the presentation and make each bite even more delightful.
Side Dishes
Complement your Hocus Pocus Pops with warm drinks like hot chocolate, spiced cider, or a frothy latte to create a cozy atmosphere. Fresh fruit or light cookies also balance the sweetness, making for a well-rounded and inviting snack experience.
Creative Ways to Present
Arrange your pops standing up in a decorated jar filled with candy corn or colored sugar for a whimsical display. Wrapping each pop individually in clear cellophane tied with ribbon also makes them charming party favors or gifts that everyone will adore.
Make Ahead and Storage
Storing Leftovers
If you’re lucky enough to have leftovers, store your Hocus Pocus Pops Recipe treats in an airtight container at room temperature. They’ll stay fresh and crunchy for a couple of days, so you can enjoy that magical flavor a bit longer.
Freezing
You can freeze the marshmallow pops to extend their shelf life. Wrap each pop individually in plastic wrap and place them in a freezer-safe container. When thawed, the pops maintain their chewiness and chocolate coating quite well, perfect for preparing ahead for a festive event.
Reheating
Since these pops are best served cold or at room temperature, reheating isn’t necessary or recommended. Just allow frozen pops to thaw naturally, and they’ll be ready to enjoy without losing their charm or texture.
FAQs
Can I use other types of chocolate?
Absolutely! Feel free to substitute the milk or white chocolate chips with dark chocolate or flavored melts. Just keep in mind that the flavor profile will change, but it can add a delicious twist!
What if I don’t have sprinkles or edible glitter?
No worries at all. Plain coated marshmallow pops still taste fantastic, or you can get creative with crushed nuts, mini candy pieces, or colored sugar for texture and flair.
How long do the pops last before they start losing freshness?
Stored correctly in an airtight container, they’re best enjoyed within 3 to 4 days to keep the marshmallows soft and the chocolate crisp.
Can kids get involved in making the Hocus Pocus Pops Recipe?
Definitely! This is a wonderful no-bake project for little hands to help with dipping and decorating, making it a great family activity full of giggles and creativity.
Is there a way to make these pops vegan or dairy-free?
Yes! Look for vegan marshmallows and dairy-free chocolate alternatives to customize this recipe according to your dietary preferences while still capturing all the fun and flavor.
Final Thoughts
There’s a special kind of joy that comes from making something sweet, pretty, and simple like the Hocus Pocus Pops Recipe. Whether you treat yourself or share them with friends, these pops bring a little enchantment to any day. So grab your ingredients, roll up your sleeves, and let the magic unfold right in your kitchen — you won’t regret a single bite!
Print
Hocus Pocus Pops Recipe
- Prep Time: 10 minutes
- Cook Time: 10 minutes
- Total Time: 20 minutes
- Yield: 12 servings
- Category: Dessert
- Method: No-Cook
- Cuisine: American
Description
Hocus Pocus Pops are a magical and festive treat featuring marshmallows dipped in luscious milk and white chocolate, adorned with colorful sprinkles and edible glitter. Perfect for parties or Halloween celebrations, these pops are quick to make and delightfully fun to eat.
Ingredients
Chocolate Coatings
- 1 cup milk chocolate chips
- 1 cup white chocolate chips
Marshmallow Pops
- 12 large marshmallows
- 12 lollipop sticks
Decorations
- Assorted sprinkles
- Edible glitter
- Wax paper
Instructions
- Prepare the work surface: Line a baking sheet with wax paper and set it aside to keep the marshmallow pops from sticking once coated.
- Insert sticks: Push one lollipop stick into each large marshmallow, ensuring they are secure for dipping and handling.
- Melt chocolates: In two separate microwave-safe bowls, melt the milk chocolate chips and white chocolate chips by heating them in 30-second intervals, stirring well after each until smooth and fully melted.
- Dip marshmallows in milk chocolate: Dip half of the marshmallows into the melted milk chocolate, gently tapping off the excess chocolate to avoid clumps, then place them on the prepared baking sheet.
- Dip marshmallows in white chocolate: Repeat the dipping process with the remaining marshmallows into the white chocolate, and place them on the sheet.
- Decorate: While the chocolate is still wet, sprinkle each pop with assorted sprinkles and edible glitter to add a magical decorative touch.
- Set the chocolate: Refrigerate the decorated marshmallow pops for about 15 minutes, or until the chocolate hardens completely.
- Serve: Once fully set, serve the Hocus Pocus Pops to guests and enjoy this enchanting treat!
Notes
- Ensure the marshmallows are securely on the sticks to prevent them from falling off during dipping.
- Use wax paper or parchment to avoid sticking and ease cleanup.
- Be gentle when tapping off excess chocolate to maintain a smooth coating.
- The pops can be stored in an airtight container in the refrigerator for up to two days.
- For a vegan version, substitute chocolate chips and marshmallows with vegan alternatives.


