
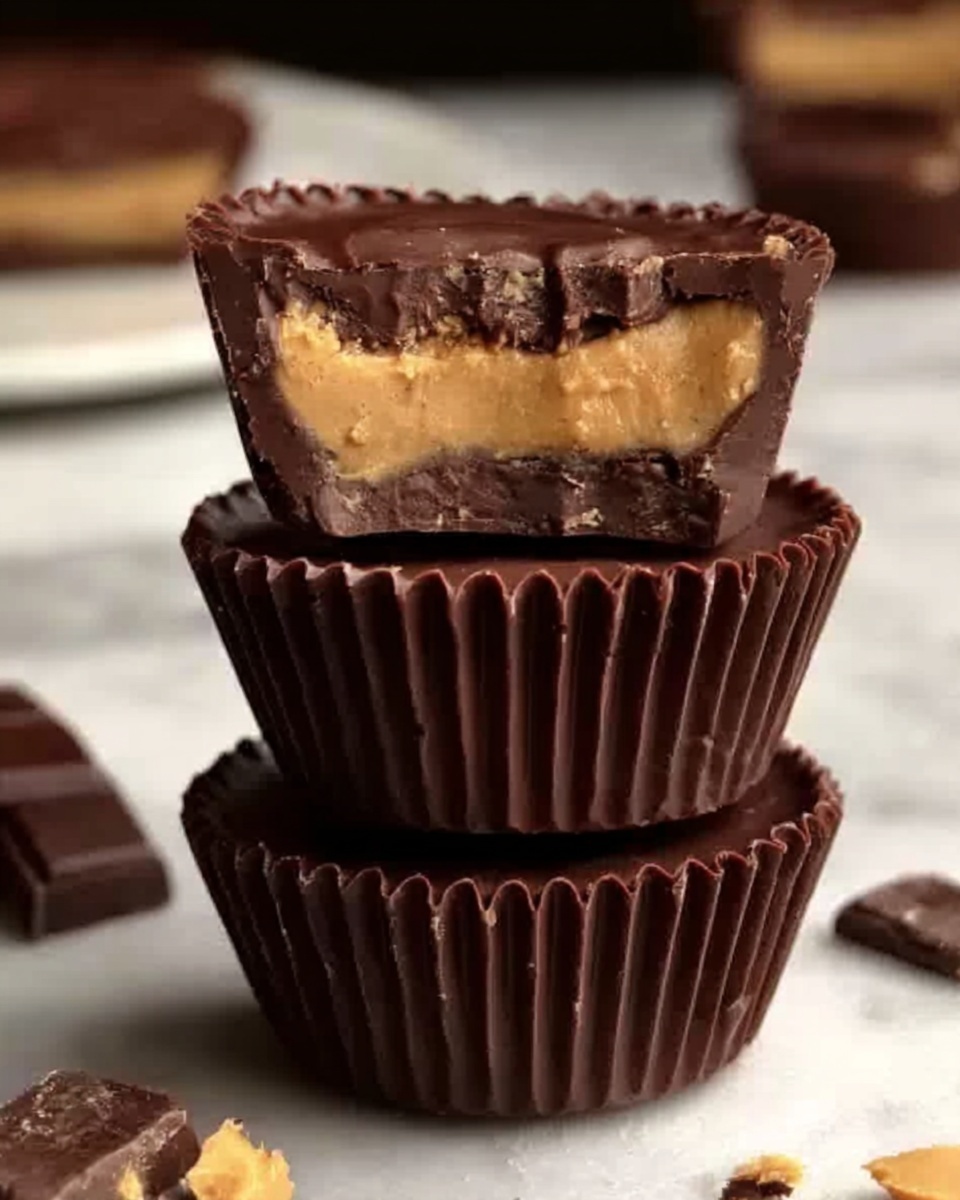
If you’re craving a treat that feels indulgent yet supports your fitness goals, this Protein Peanut Butter Cups Recipe is an absolute game-changer. Imagine the dreamy combination of rich dark chocolate mingled with creamy peanut butter, all boosted with a scoop of protein powder to keep you energized. These cups are not only delectably satisfying but also simple to make at home, turning an ordinary snack into a wholesome delight. Whether you need a post-workout pick-me-up or a guilt-free dessert, these Protein Peanut Butter Cups deliver on taste and nutrition every time.

Ingredients You’ll Need
Gathering your ingredients is a breeze, and each one plays a starring role in crafting the perfect balance between creamy, sweet, and satisfyingly chocolaty flavors.
- Dark chocolate chips: Use quality dark chocolate for a rich, slightly bitter base that pairs wonderfully with peanut butter.
- Coconut oil: Helps the chocolate melt smoothly and sets a shiny, firm texture in the final cup.
- Natural peanut butter: Choose creamy, no-sugar-added for that authentic peanut flavor and smooth texture.
- Protein powder (vanilla or chocolate): Adds a nutritional boost and subtle flavor that blends perfectly with peanut butter.
- Maple syrup: A natural sweetener that balances the bitterness of dark chocolate and enhances the peanut butter filling.
- Sea salt: A sprinkle on top elevates the flavor by bringing out the sweet and savory contrast.
How to Make Protein Peanut Butter Cups Recipe
Step 1: Melt the Chocolate
Start by gently melting your dark chocolate chips with the coconut oil until smooth and glossy. This step is crucial for achieving that silky texture that will harden perfectly in the freezer and provide the classic shell of your peanut butter cups.
Step 2: Create the Chocolate Base
Line a muffin tin with paper liners to keep your cups neat and easy to handle. Spoon a layer of melted chocolate into each liner, making sure the base is fully covered. Pop the tin into the freezer to set the chocolate before moving on to the filling—this helps prevent the layers from mixing.
Step 3: Prepare the Peanut Butter Filling
While your chocolate is chilling, mix together the peanut butter, protein powder, and maple syrup until smooth and creamy. This mixture will be the heart of your peanut butter cups, offering a delightful, protein-packed center that isn’t overly sweet.
Step 4: Assemble the Cups
Scoop a dollop of the peanut butter mixture on top of the chocolate base in each muffin liner. Then, cover the filling with the remaining melted chocolate to seal each cup. This layering step ensures each bite delivers a perfect balance of chocolate and peanut butter.
Step 5: Add the Finishing Touches and Freeze
Sprinkle a pinch of sea salt on the top of each cup for that irresistible touch of contrast. Freeze the assembled cups until they are completely firm, about 20 to 30 minutes. Once set, they’re ready to enjoy or store for later.
Step 6: Enjoy Your Protein Peanut Butter Cups
These cups are best enjoyed cold, straight from the freezer or fridge. The combination of creamy peanut butter and smooth chocolate makes for a snack that’s both nourishing and indulgently delicious.
How to Serve Protein Peanut Butter Cups Recipe
Garnishes
To make your Protein Peanut Butter Cups look even more inviting, consider topping them with finely chopped nuts, a drizzle of extra melted dark chocolate, or a light dusting of cocoa powder. These little touches add texture and visual appeal, making your homemade cups feel extra special.
Side Dishes
Pair these peanut butter cups with a fresh fruit salad or a smoothie for a balanced snack that combines protein, healthy fats, and refreshing vitamins. A chilled glass of almond milk or your favorite coffee also complements the rich flavors beautifully.
Creative Ways to Present
Wondering how to jazz up your Protein Peanut Butter Cups Recipe for parties or gifting? Arrange them in a decorative box with parchment paper or stack them in small glass jars tied with twine. You can even layer the cups with crushed nuts or granola for a fun surprise in each bite.
Make Ahead and Storage
Storing Leftovers
Store leftover peanut butter cups in an airtight container in the refrigerator for up to a week. This keeps the chocolate firm but soft enough to chew comfortably without losing any flavor or texture.
Freezing
If you want to enjoy these cups over a longer period, freezing is your best friend. Place them in a freezer-safe container with parchment paper between layers to prevent sticking. They’ll keep well for up to a month and thaw quickly when you’re ready to indulge.
Reheating
Since these cups are best enjoyed firm and chilled, reheating is generally not recommended. However, if your chocolate gets too hard from the fridge or freezer, simply let the cups sit at room temperature for a few minutes before eating so they soften just enough for perfect mouthfeel.
FAQs
Can I use peanut butter alternatives in the Protein Peanut Butter Cups Recipe?
Absolutely! Almond butter or cashew butter works wonderfully if you want a different flavor profile or have peanut allergies. Just opt for creamy, natural nut butters without added sugars.
What type of protein powder is best for this recipe?
Vanilla or chocolate protein powders are both great choices. Whey protein blends smoothly, but plant-based options like pea or rice protein also work well and keep the recipe vegan-friendly if your protein powder is dairy-free.
Can these cups be made without protein powder?
Yes, if you prefer a simpler treat, you can omit the protein powder. The peanut butter filling will still be delicious, though it won’t offer the same protein boost that makes this recipe special.
How do I prevent the chocolate and peanut butter layers from mixing?
Freezing the chocolate base before adding the peanut butter filling is key. Make sure the chocolate is fully solidified so that when you add the filling, the layers stay distinct and neat.
Is it possible to sweeten the recipe without maple syrup?
Definitely! Honey, agave syrup, or a splash of coconut nectar can be substituted for maple syrup. Just keep the quantity similar to maintain the right sweetness and consistency.
Final Thoughts
Whipping up this Protein Peanut Butter Cups Recipe is a wonderful way to have your treat and your nutrition too. The blend of chocolate, peanut butter, and protein makes every bite a celebration that doesn’t derail your healthy eating goals. Give it a try—you’ll be amazed at how quickly these cups become your go-to snack to satisfy sweet cravings and fuel your day with goodness.
Print
Protein Peanut Butter Cups Recipe
- Prep Time: 15 minutes
- Cook Time: 40 minutes (includes freezing time)
- Total Time: 55 minutes
- Yield: 12 servings
- Category: Snack
- Method: Freezing
- Cuisine: American
- Diet: Low Fat
Description
These Protein Peanut Butter Cups are a delicious and healthy twist on the classic treat, combining rich dark chocolate, creamy natural peanut butter, and protein powder for a satisfying snack. Perfect for a post-workout boost or an indulgent yet guilt-free dessert, these homemade cups are easy to make and packed with flavor and nutrition.
Ingredients
Chocolate Layer
- 1 cup dark chocolate chips
- 1 tablespoon coconut oil
Peanut Butter Filling
- 1/2 cup natural peanut butter
- 1 scoop protein powder (vanilla or chocolate flavor)
- 2 tablespoons maple syrup
Garnish
- Sea salt, for sprinkling
Instructions
- Melt the Chocolate: In a microwave-safe bowl or using a double boiler, melt the dark chocolate chips and coconut oil together until the mixture is smooth and fully combined, stirring frequently to avoid burning.
- Prepare the Base: Line a muffin tin with paper liners and spoon a small amount of the melted chocolate into the bottom of each liner to create the base layer. Spread evenly and place the tin in the freezer to set for about 10-15 minutes.
- Make the Peanut Butter Filling: While the chocolate base is setting, mix the natural peanut butter, protein powder, and maple syrup in a bowl until fully combined and creamy.
- Add the Filling: Remove the muffin tin from the freezer and spoon the peanut butter mixture evenly over the hardened chocolate bases in each liner, creating the filling layer.
- Top with Chocolate: Spoon the remaining melted chocolate over the peanut butter layer, ensuring the filling is completely covered. Smooth the tops if necessary.
- Sprinkle Sea Salt and Freeze: Lightly sprinkle sea salt atop each cup for a perfect balance of flavor, then return the muffin tin to the freezer. Freeze until the cups are firm, about 20-30 minutes.
- Enjoy: Once firm, remove the peanut butter cups from the liners and enjoy your homemade, protein-packed treats!
Notes
- Use natural peanut butter without added sugar or hydrogenated oils for the healthiest option.
- The protein powder flavor can be adjusted to vanilla or chocolate depending on your preference.
- Store the peanut butter cups in an airtight container in the freezer for up to two weeks.
- For a dairy-free version, ensure your protein powder and chocolate chips are vegan-friendly.
- If you prefer a sweeter treat, you can add extra maple syrup or a touch of honey to the peanut butter filling.


