
If you’ve ever dreamed of baking your own tangy, flavorful sourdough breads at home, the first step is making your own starter culture, and nothing beats this Simple Sourdough Starter Recipe to get you going. It’s a wonderfully straightforward process that transforms basic flour and water into a lively, bubbly elixir bursting with natural yeast and beneficial bacteria. The magic of fermentation unfolds before your eyes, setting the foundation for delicious, crusty loaves that fill your kitchen with the most irresistible aroma. Whether you’re a baking newbie or a seasoned bread enthusiast, this recipe will quickly become your trusted companion on your sourdough journey.
Ingredients You’ll Need
Creating the perfect sourdough starter is beautifully simple, relying on just a couple of essential ingredients that work together to cultivate all those lively bubbles you want to see. Each component plays a critical role – the flour provides nourishment for natural yeast and bacteria, while the lukewarm water creates exactly the right environment for fermentation to begin.
- 1 cup of all-purpose flour: This type of flour offers a balanced mix of nutrients and natural yeasts to get your starter bubbling.
- 1/2 cup of lukewarm water: Water at just the right temperature encourages yeast growth without killing the microorganisms.
How to Make Simple Sourdough Starter Recipe
Step 1: Mix Flour and Water
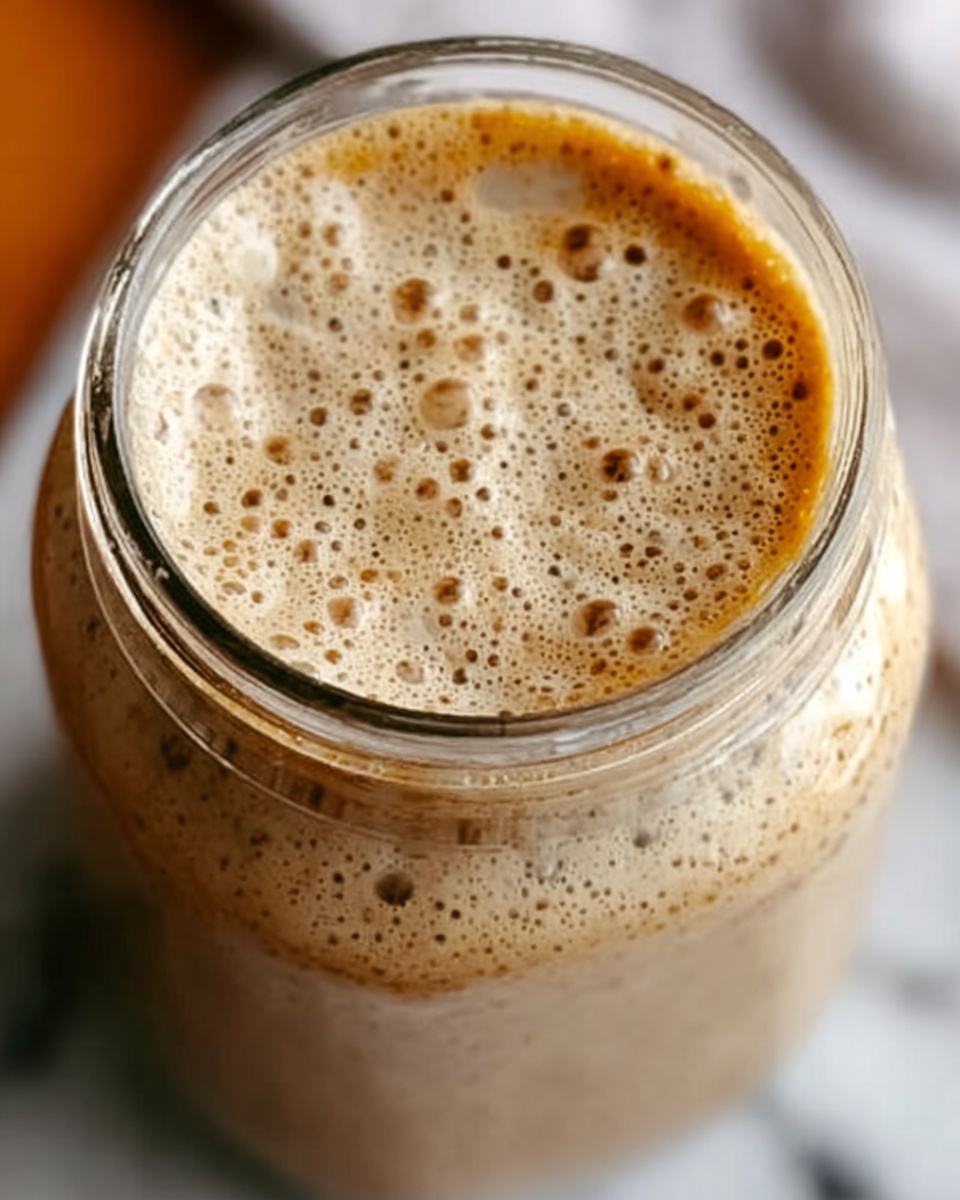
Start by combining 1 cup of all-purpose flour with 1/2 cup of lukewarm water in a clean glass or plastic container. Stir vigorously until you eliminate all lumps and create a smooth batter-like consistency. This mixture is your starter’s base, where the wild yeast and bacteria begin their transformation.
Step 2: Cover and Rest
Lightly cover your container with a clean kitchen towel or plastic wrap, leaving enough airflow for the microorganisms to breathe. Place it somewhere warm but out of direct sunlight – a consistent warm spot will give your starter the cozy environment it needs to wake up and begin the fermentation process.
Step 3: Allow Fermentation
Let your mixture sit calmly at room temperature for 24 hours. After this time, you should spot tiny bubbles forming on the surface, a lively sign that the fermentation has begun and natural yeast are at work developing flavor and activity within your starter.
Step 4: Discard and Feed
After the initial 24 hours, it’s time to do a little housekeeping: discard half of your starter to keep the balance of acidity and yeast levels healthy. Then feed the remaining portion with 1/2 cup fresh flour and 1/4 cup lukewarm water, mixing thoroughly. This feeding routine nurtures your starter, promoting continued growth and fermentation strength.
Step 5: Repeat Feeding Routine
Cover your starter again and let it rest at room temperature for another 24 hours. Continue this daily feeding ritual, discarding half and replenishing with fresh flour and water, for about 5 to 7 days. By the end, your starter should be bubbly, fragrant, and actively doubling in volume — a perfect partner for all your sourdough baking adventures.
How to Serve Simple Sourdough Starter Recipe

Garnishes
While the starter itself isn’t a dish to be served, it’s the heart of many delicious sourdough creations. When using your starter in recipes like pancakes or bread, consider garnishing your final dish with fresh herbs, a drizzle of olive oil, or a sprinkle of coarse sea salt to complement the starter’s subtle tang.
Side Dishes
Think beyond just bread; sourdough pancakes or waffles made from your starter pair wonderfully with fresh fruit compotes, creamy yogurt, or nut butters. These simple sides elevate your breakfast or snack using the love and effort you put into cultivating your starter.
Creative Ways to Present
Get playful by turning your bubbly starter into a showstopper. Try creating sourdough flatbreads topped with roasted vegetables, or artisan sourdough crumble-style pastries. Serving fresh slices from your sourdough loaf alongside a hearty stew or vibrant salad showcases just how versatile this starter can be.
Make Ahead and Storage
Storing Leftovers
If you have leftover starter after feeding, it’s perfectly fine to keep it stored in the refrigerator. This slows down fermentation, allowing you to feed it less frequently. Just remember to refresh it at least once a week with a feeding to keep those friendly yeasts happy and active.
Freezing
For longer storage, your simple sourdough starter can be frozen. Before freezing, feed it well and let it become active. Then transfer a portion into a freezer-safe container. When you’re ready to use it again, thaw gently at room temperature and refresh with a few feedings to revive the yeast activity.
Reheating
Though starters don’t exactly require reheating, warming your lukewarm water before feedings helps boost yeast activity, especially if your kitchen is on the cooler side. Keeping your starter in a warm spot post-feeding will encourage lively bubbles and optimal fermentation.
FAQs
How long does it take for the starter to become fully active?
Most starters become bubbly and ready between 5 to 7 days with regular daily feedings, though timing can vary slightly depending on room temperature and flour type.
Can I use other types of flour to make this starter?
Absolutely! While all-purpose flour works great for this Simple Sourdough Starter Recipe, whole wheat or rye flours can add extra nutrients and flavor complexity to your starter, often speeding up fermentation.
What does it mean if my starter develops a liquid on top?
That liquid, often called “hooch,” is a sign your starter is hungry. It’s harmless and can be stirred back in before feeding, or poured off if you prefer a less tangy flavor.
Do I need a special container for making the starter?
No special container is required. A clean glass or food-safe plastic container with enough room for the starter to expand and airflow is perfect for nurturing your Simple Sourdough Starter Recipe.
Can I skip discarding half of the starter during feedings?
Discarding helps maintain the right balance of acidity and yeast concentration, so it’s best not to skip this step. If you keep all the starter, you risk overwhelming the environment, which can inhibit proper fermentation.
Final Thoughts
There is something truly rewarding about watching your Simple Sourdough Starter Recipe come to life—bubbling, smelling tangy, and growing stronger each day. It’s the first step towards endless baking possibilities and comforting homemade bread that fills your home with warmth. Give this recipe a try and savor the joyful, hands-on experience of crafting your living bread culture from scratch. Happy fermenting!
Print
Simple Sourdough Starter Recipe
- Prep Time: 5 minutes
- Cook Time: 0 minutes
- Total Time: 5-7 days (including daily 5-minute feedings)
- Yield: 1 cup of active sourdough starter
- Category: Baking
- Method: No-Cook
- Cuisine: International
- Diet: Vegan
Description
This easy-to-make sourdough starter recipe guides you through creating a natural yeast culture using just flour and water. By fermenting the mixture over several days with regular feedings, you’ll develop a bubbly, active starter perfect for baking flavorful, tangy sourdough bread at home.
Ingredients
Starter Ingredients
- 1 cup all-purpose flour
- 1/2 cup lukewarm water
Feeding Ingredients
- 1/2 cup all-purpose flour
- 1/4 cup lukewarm water
Instructions
- Mix Flour and Water: Combine 1 cup of all-purpose flour with 1/2 cup of lukewarm water in a clean glass or plastic container. Stir thoroughly to eliminate lumps and form a smooth batter-like consistency.
- Cover and Rest: Cover the container loosely with a clean kitchen towel or plastic wrap to allow airflow. Place it in a warm spot, away from direct sunlight, to encourage fermentation.
- Allow Fermentation: Let the mixture sit at room temperature for 24 hours. After this period, you should see bubbles forming on the surface, indicating that natural yeast and bacteria have started fermenting the mixture.
- Discard and Feed: After the first 24 hours, discard half of the starter mixture to regulate acidity and yeast levels. Then add 1/2 cup of flour and 1/4 cup of lukewarm water to the remaining starter. Stir well to incorporate the new ingredients.
- Repeat Feeding Routine: Cover the container again and let it rest at room temperature for another 24 hours. Continue the daily feeding process—discarding half and feeding with flour and water—until the starter is bubbly, active, and consistently rising, usually within 5-7 days.
Notes
- Use unchlorinated water if possible, as chlorine can inhibit fermentation.
- Maintain a warm environment around 70-75°F (21-24°C) for optimal fermentation.
- The starter’s smell might be tangy or slightly sour; this is normal and a sign of healthy fermentation.
- If mold or an off-putting smell develops, discard the starter and start over.
- Once active, the starter can be stored in the refrigerator and fed weekly.


